

The app at a glance
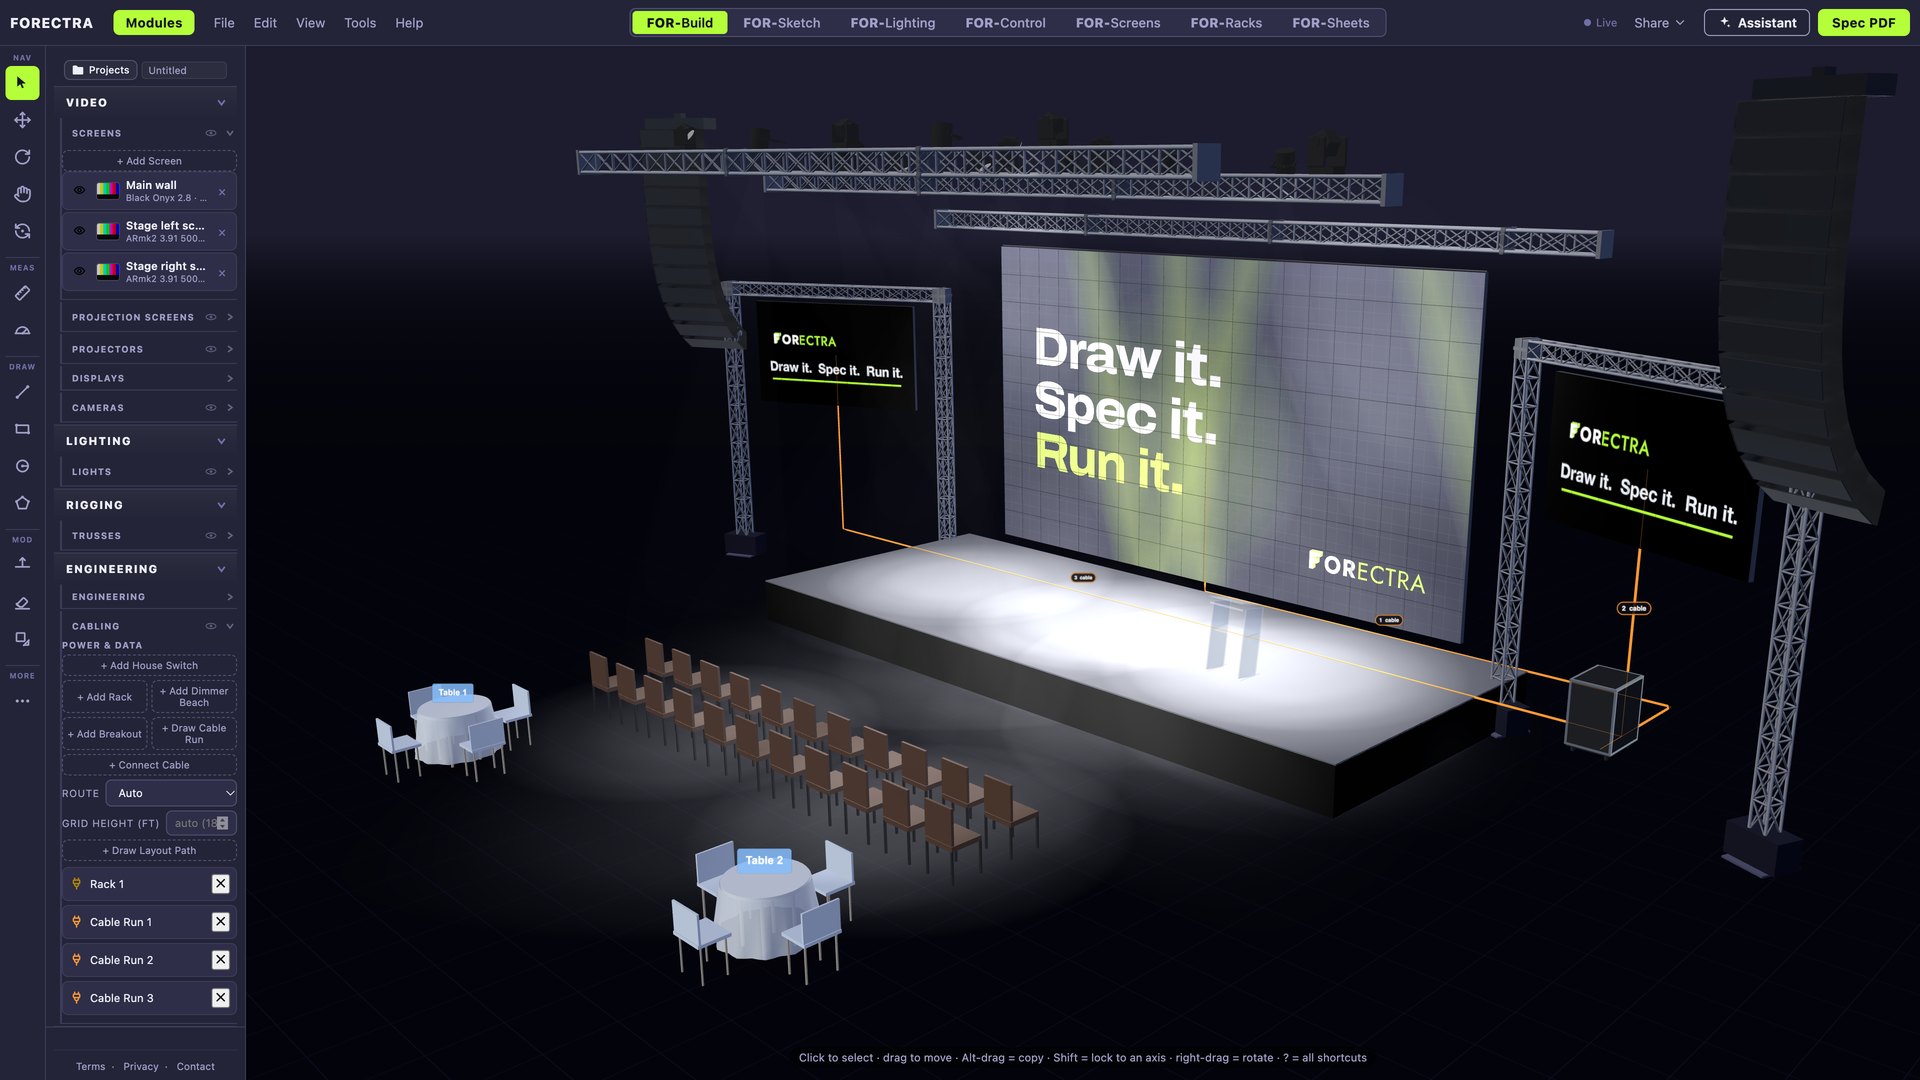
Top bar, left to right. The FORECTRA mark (on the box: FOR-X 8). Modules: which parts of the app are on for this show (lights, video, rigging, audio, venue, scenic, engineering, imports); a module that is off hides its sidebar sections and its pages in the paperwork. File · Edit · View · Tools · Help: the menus (what is in them is in 1.3). The workspace tabs: FOR-Build, FOR-Sketch, FOR-Lighting, FOR-Control, FOR-Screens, FOR-Racks, FOR-Sheets. On the right: Live (the box is on the network), Share (Collaborator, Client View, Reviews, Walkthrough), Assistant, Spec PDF.
Left. The tool rail: Select, Move, Rotate, Pan, Orbit; Measure and Protractor; the draw tools (Line, Rectangle, Circle, Polygon); Push/Pull, Eraser, Scale; More (Arc, Offset, Window, Center Lines). Beside it the sidebar: one section per module (Video, Lighting, Rigging, Scenic, Engineering, Audio, Venue & Seating, Imports), each with its own add buttons and its list of what is in the show.
Middle. The 3D scene. Click selects. Drag orbits. Scroll zooms. Right-drag on an object rotates it. Shift locks an axis. Alt-drag copies. Esc clears.
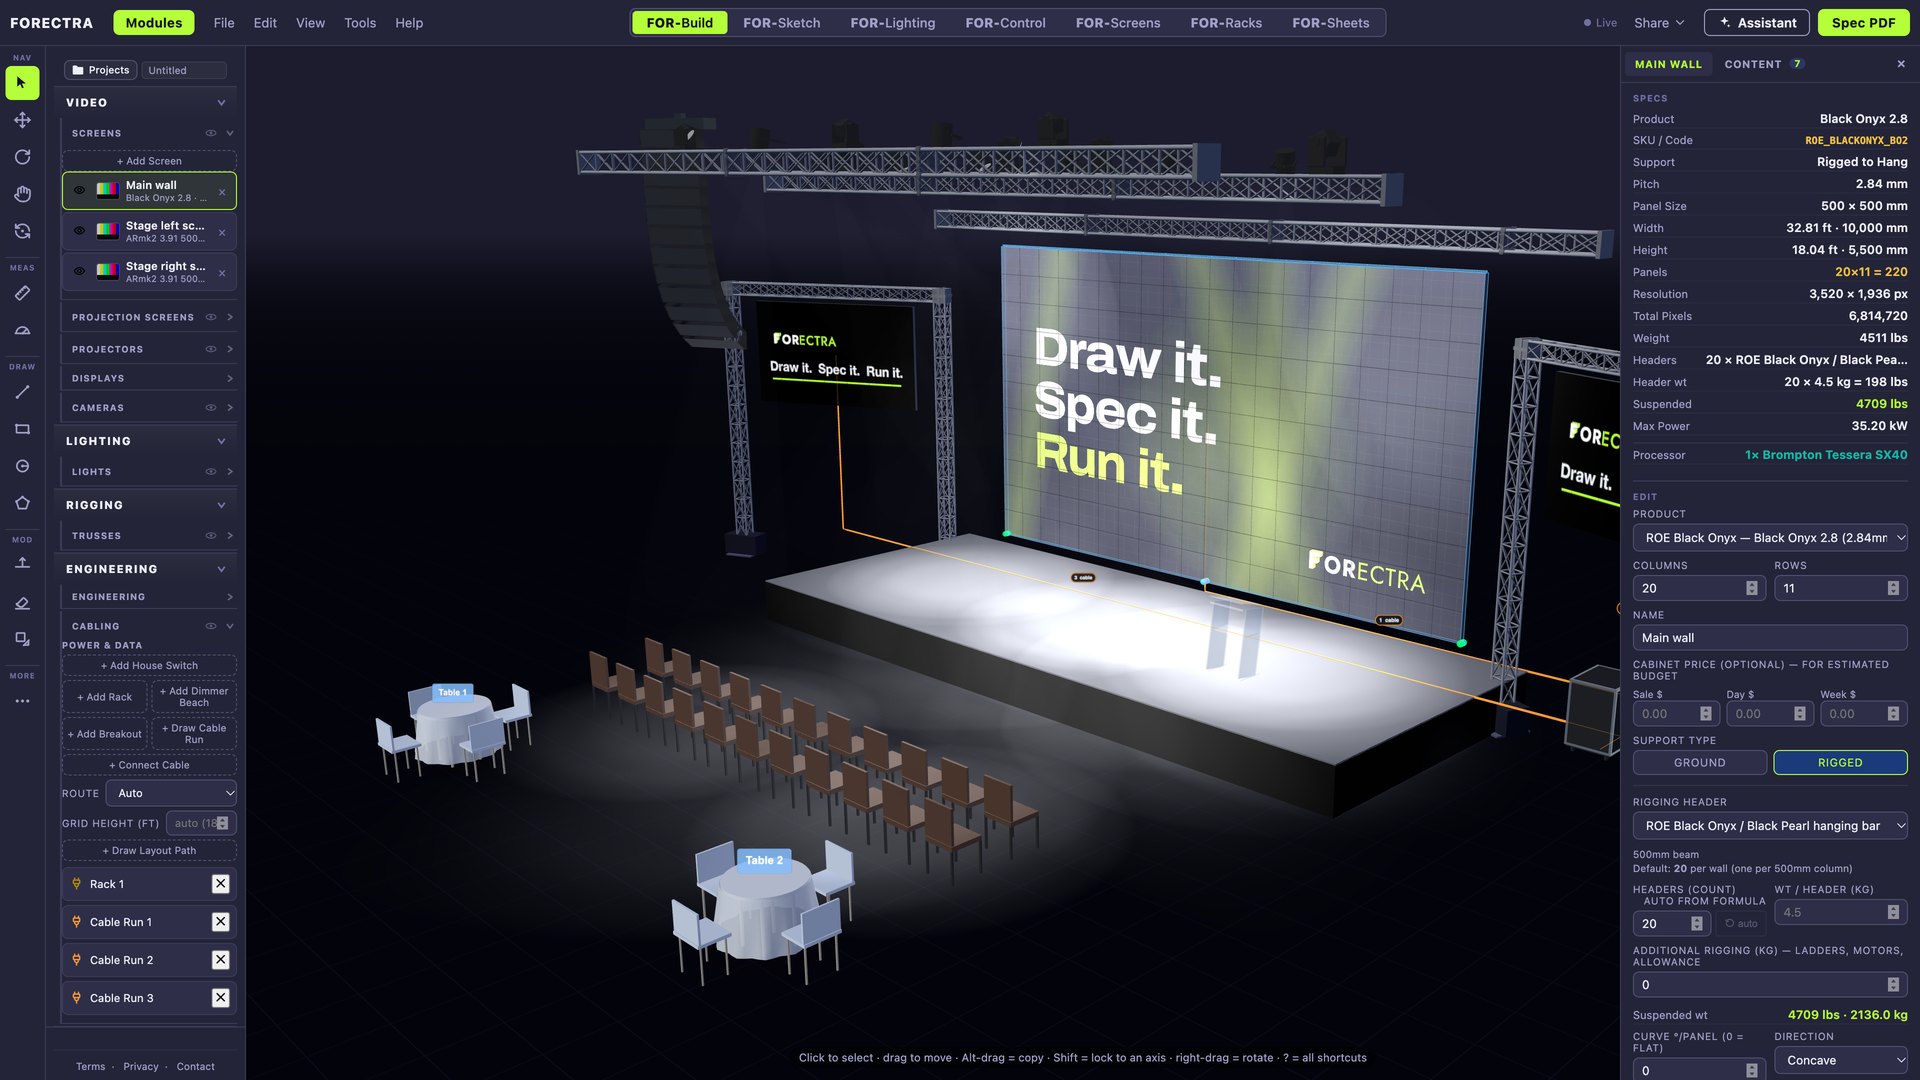
Right. The inspector: everything about the thing you clicked, with the numbers that print on the paperwork.
1.1 Modules
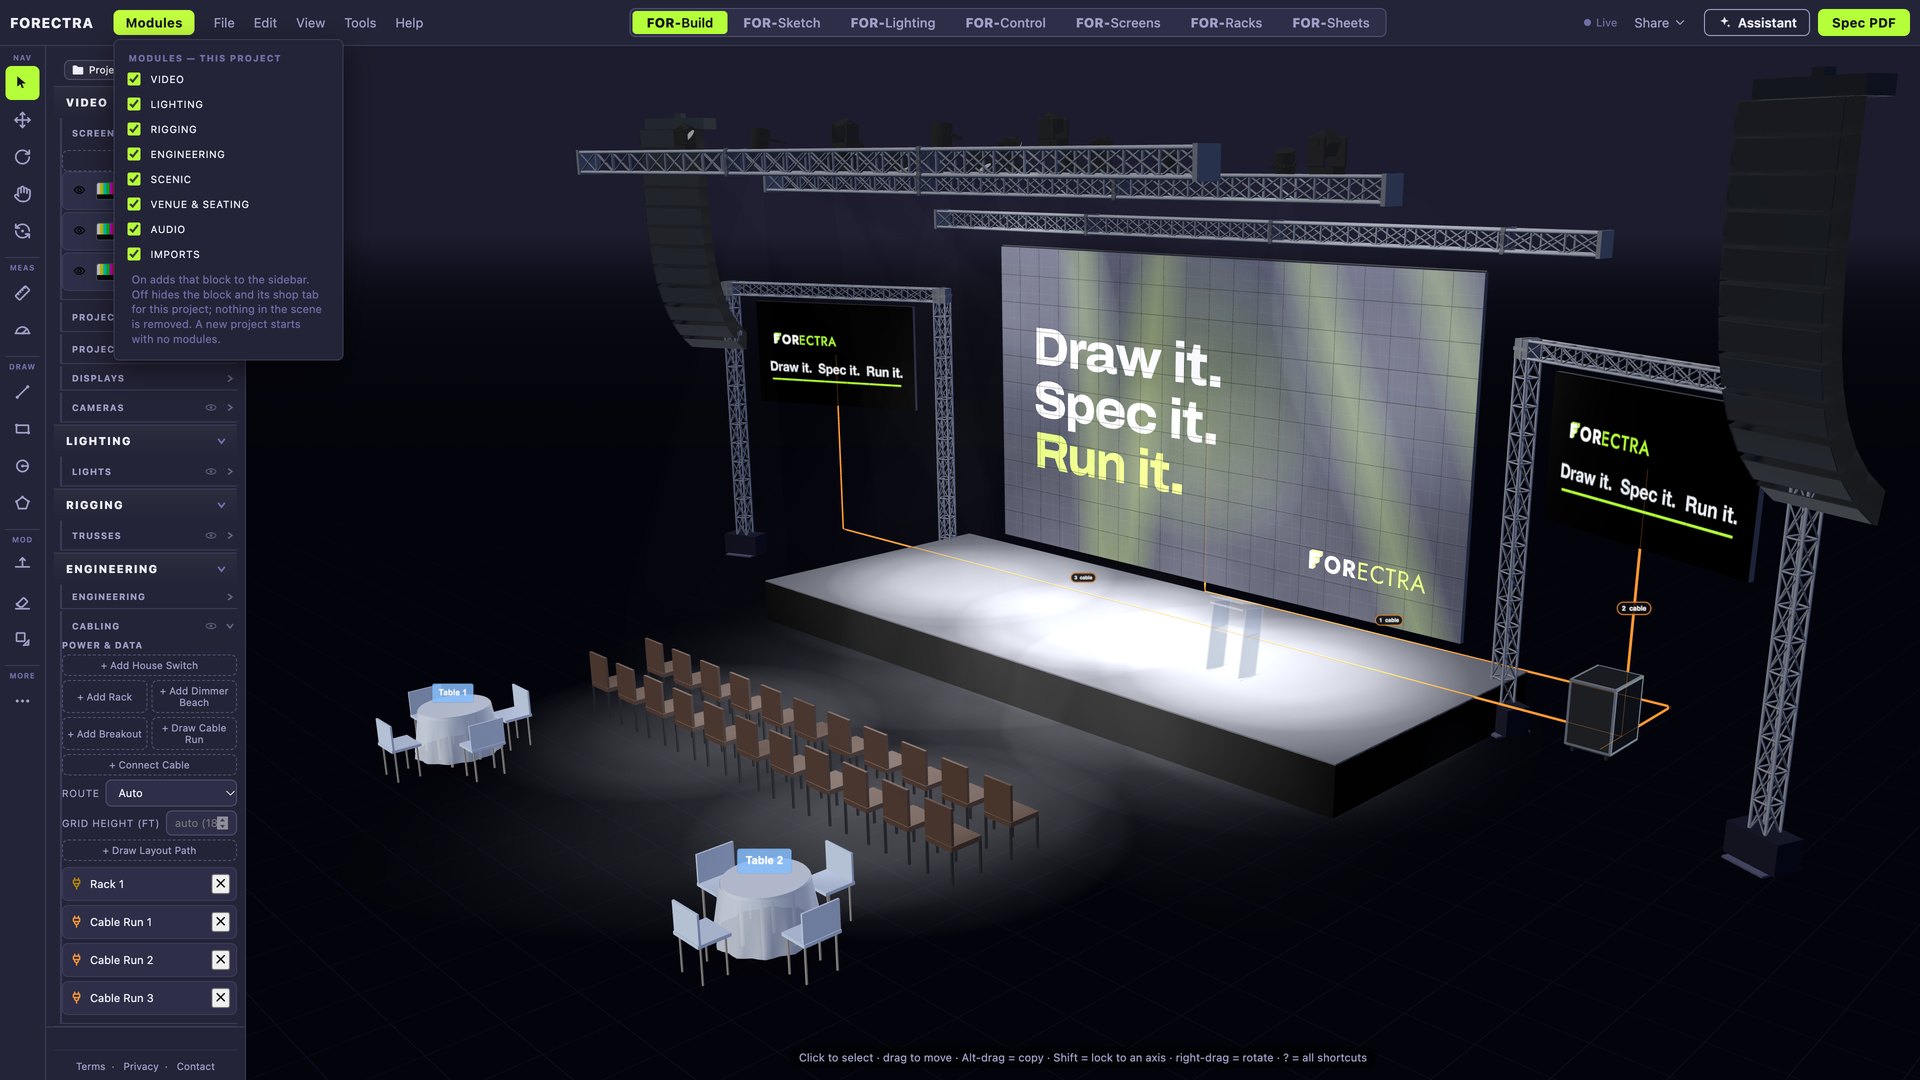
Modules are on/off switches for a show. Off = the sidebar section goes away, the Spec PDF leaves those pages out, FOR-Control hides what it does not need. A new show gets the modules its content needs; turn on what you want to add. Nothing is deleted by turning a module off.
1.2 Projects, Share, Assistant, Spec PDF
- Projects (sidebar top): your shows, saved in the browser on this machine and in your account. New, Open, Save, Save As, Download Backup, Load Backup. On the box, File → Export Show File moves a show to a thumb drive as
.json; File → Open loads it. - Share → Client View: a read-only link to the 3D for a client. Collaborator: a second designer in the same show. Reviews: comments. Walkthrough: a camera path through the set, exported as video.
- Assistant: tell it what to build ("mirror this truss", "a 40-ft truss with 12 Sharpys spaced evenly"). It shows a plan card first (objects, gear matched, notes); Build it makes it. The ask chips answer questions (total power, weight on this truss, counts, check for problems). Section 2.6.
- Spec PDF: the paperwork, one button. Section 6.
1.3 The menus
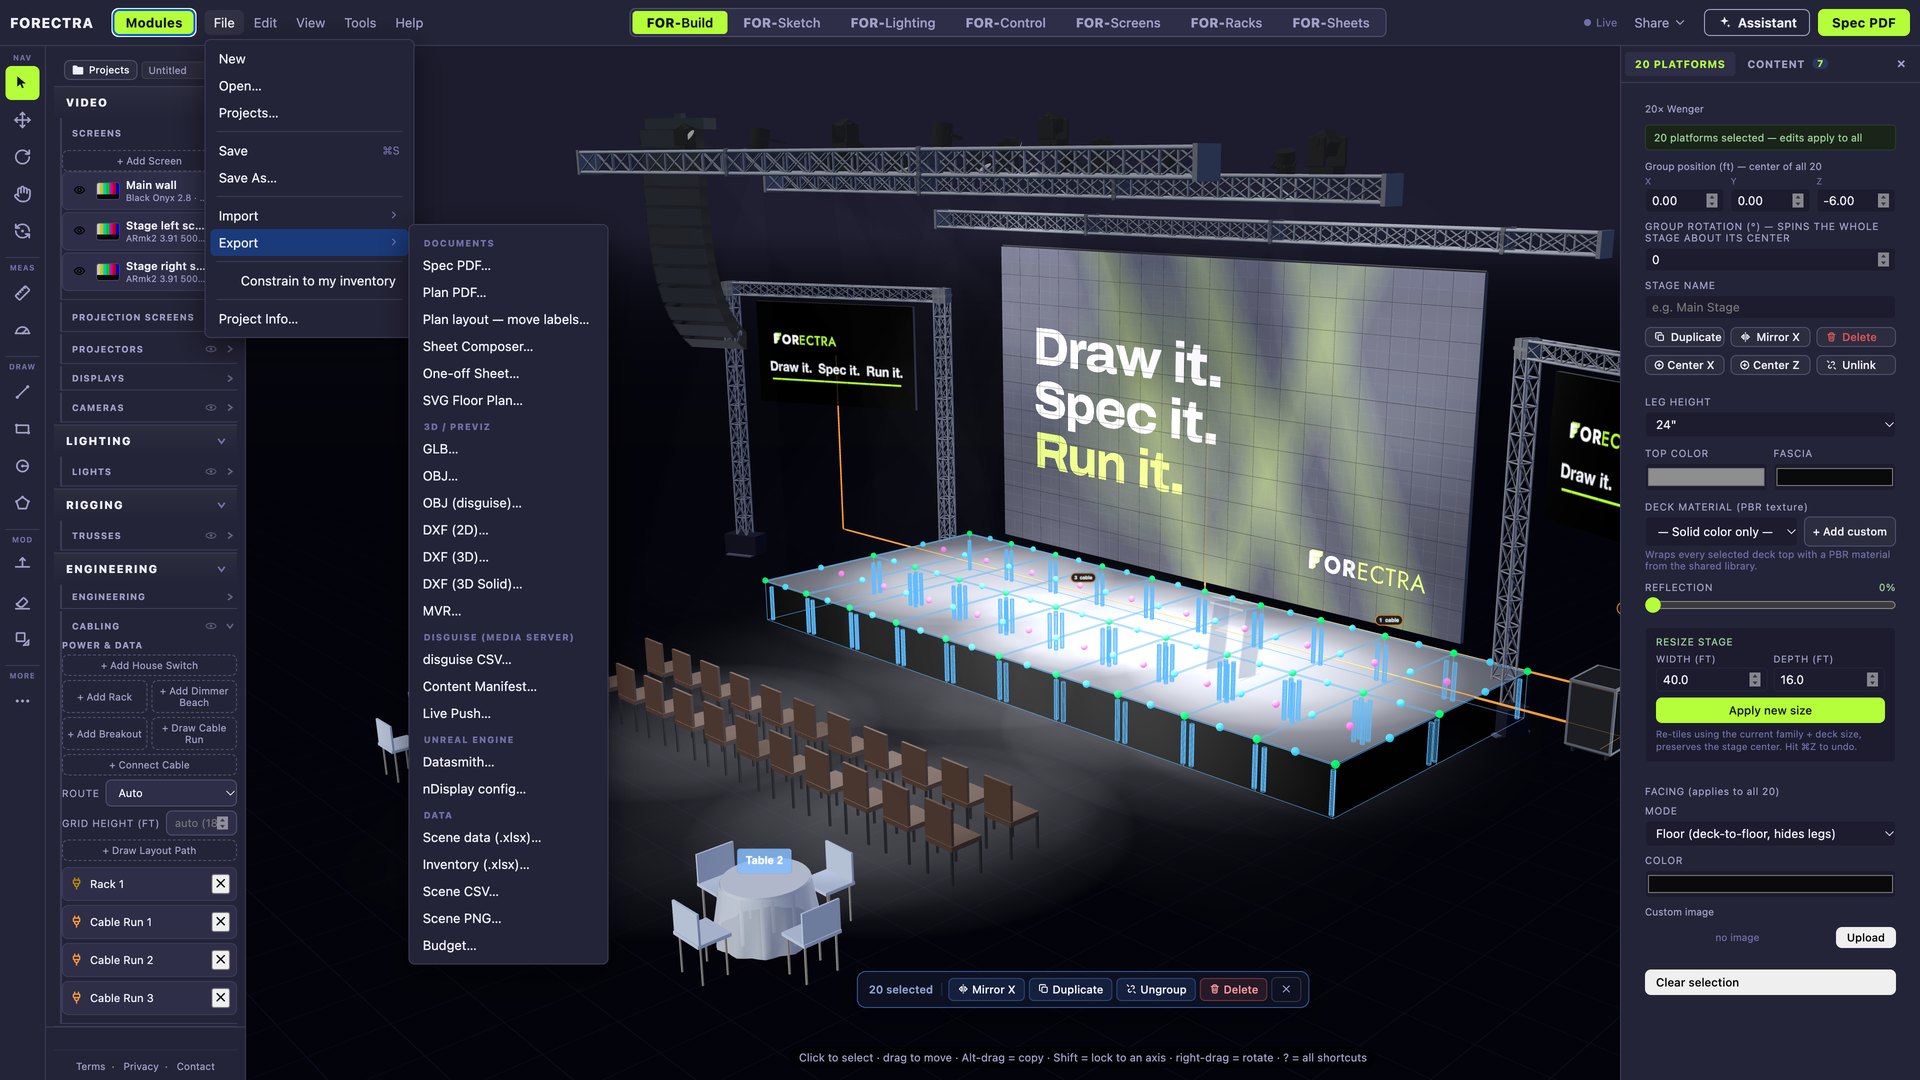
| Menu | What is in it |
|---|---|
| File | New · Open… · Projects… · Save · Save As… · Import (Scene/GLB, Inventory, Floor Plan image, 3D OBJ, 3D DXF, Clear Venue) · Export (Spec PDF, Plan PDF, Sheet Composer, One-off Sheet, SVG Floor Plan, GLB, OBJ, MVR, disguise CSV, Content Manifest, Live Push, Datasmith, nDisplay config, Scene CSV, Scene PNG, Budget) · Constrain to my inventory · Project Info… |
| Edit | Undo · Redo · Cut · Copy · Paste · Duplicate · Delete · Select All · Deselect |
| View | Elevation · Perspective · Snap · Collide with walls · Grid · System Totals · Zoom In / Out / Fit · Field of view · Show/Hide (Blocks panel, Inspector, Tool rail) |
| Tools | AI Assistant… · Raster Builder… · Measure · Home · Lock console · Idle dim… · Scale Figure… |
| Help | Docs · Show Welcome Tour · Keyboard shortcuts · Play Demo · Report a bug · About |
FOR-Build — the set in 3D
2.1 Add a screen
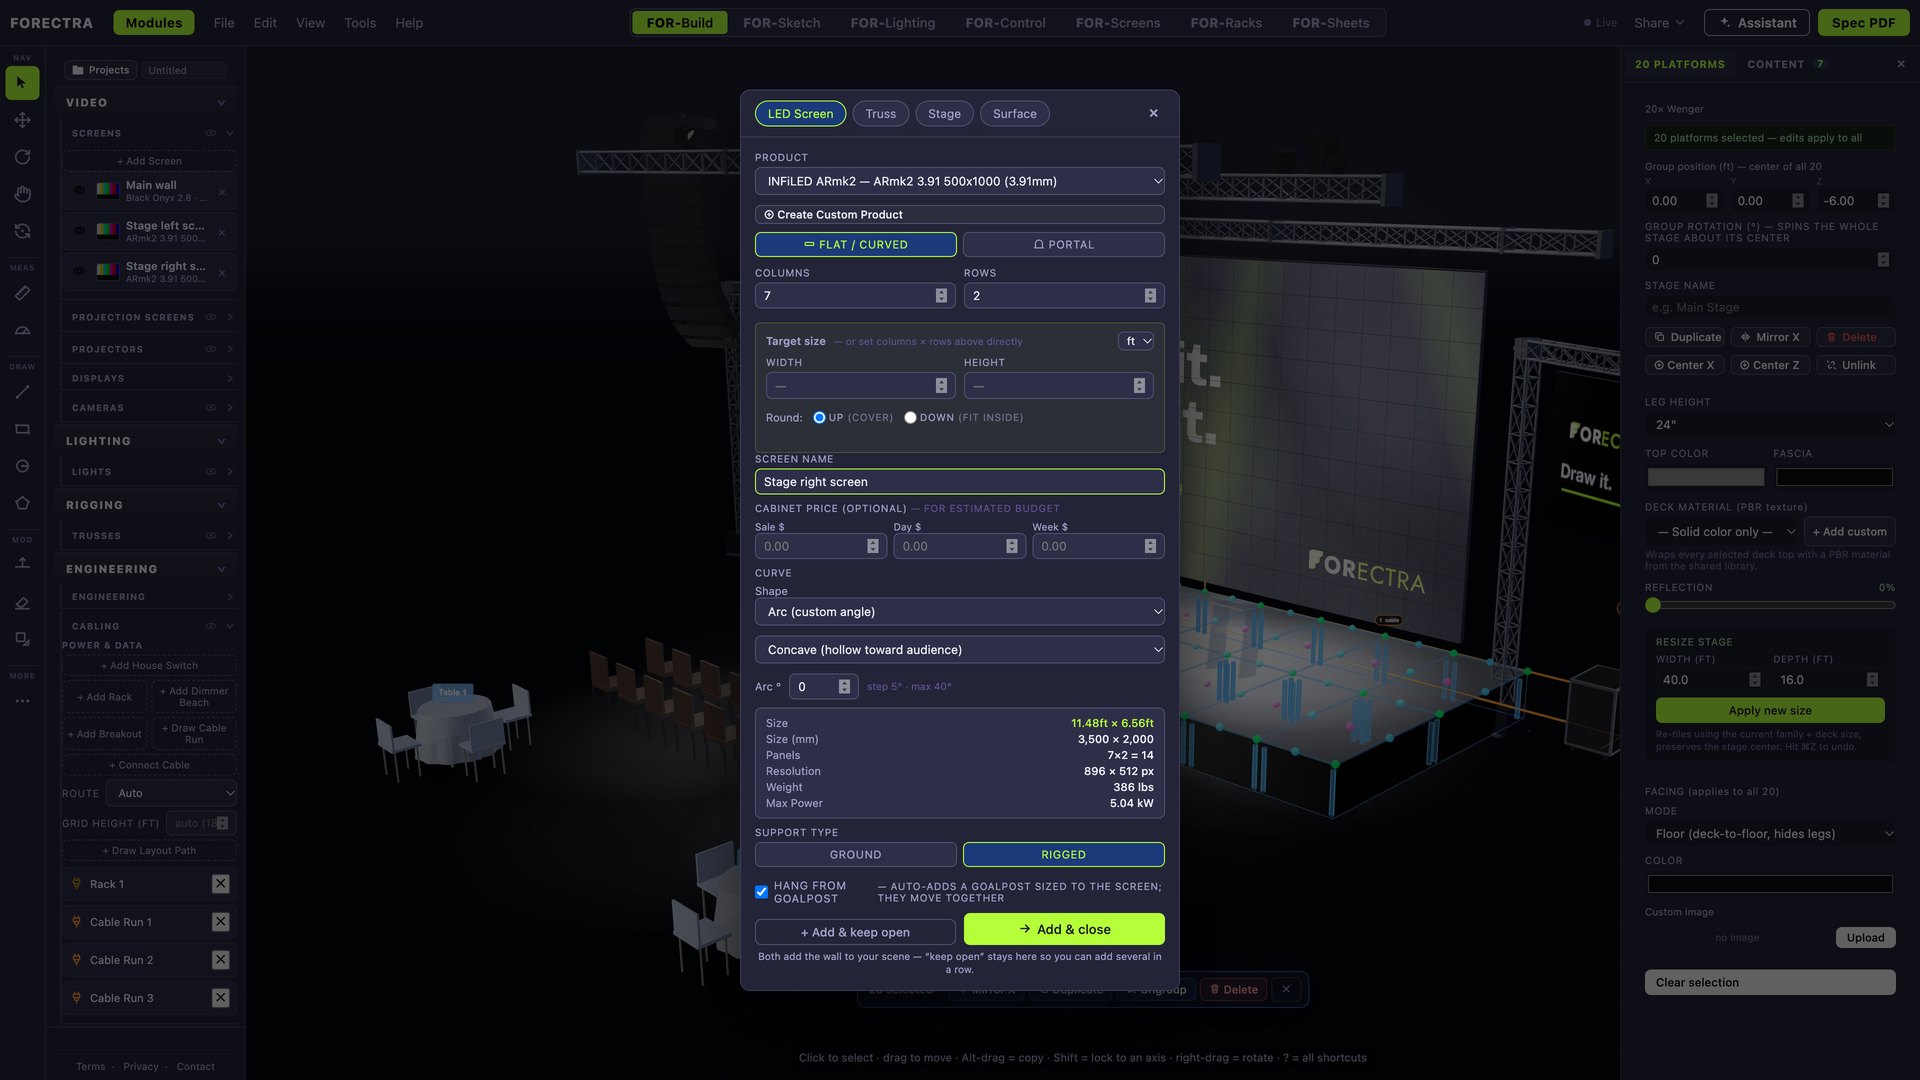
+ Add Screen in the Video section. Pick the product (the tile), set columns × rows or a target size, name it, choose Ground or Rigged. Rigged plus Hang from goalpost makes a goal post truss sized to the screen and links the two (drag either, both move). Add & close places it. The inspector then shows pitch, panel size, width, height, panel count, resolution, total pixels, weight, headers and header weight, max power, corners, and the processor it needs.
Content goes on a screen from the Video section's library (drop a file in) or from FOR-Control's bin. Fit / Stretch, pan, zoom, rotate, hue, saturation, brightness, contrast are in the inspector under Content.
2.2 Truss and lights
+ Add Truss (Rigging). Length, height, brand and series. Lights hang on a truss's nodes: + Light in the Lighting section, pick from the library (2,194 real fixtures), click a node. Or build the whole rig in FOR-Lighting (Section 3) and it is the same rig.
Every light has an aim point. Drag the aim handle, or set it from FOR-Control (AIM). Intensity, colour and beam are FOR-Control's.
2.3 Decks, scenic, furniture
+ Add Stage (Scenic): a deck family, width × depth, leg height. The deck can be skirted to the floor (Facing: floor) or show its legs. Platforms, stairs, curtains, borders, legs, pipe-and-drape are in the same section. Lecterns, chairs (singly, or in a line: place two, then continue the row), tables (with linens and seats), audience blocks, cameras, FOH gear are in Venue & Seating and Engineering.
2.4 Audio
+ Line Array (Audio): a hang of real boxes (K2, Kara II, Panther, VTX…), box count, bumper tilt, per-box splay. Point-source speakers and subs likewise. They print on the speaker schedule.
2.5 Engineering: racks, cables, power
+ Add Rack (Engineering → Power & Data): a rack on the floor. Its contents are built in FOR-Racks (Section 5). + Connect Cable: click the source (a screen, a projector, a light, a rack, a table, anything), click where it goes; the run routes itself (Auto, Floor or Grid: F, G, A). 23 cable types; the type follows what the two ends are (a wall gets fiber, a camera SDI, a PA speakon). House switch, dimmer beach, breakout boxes are the same section. Everything prints on the cable plan and the power & data pages.
2.6 The Assistant
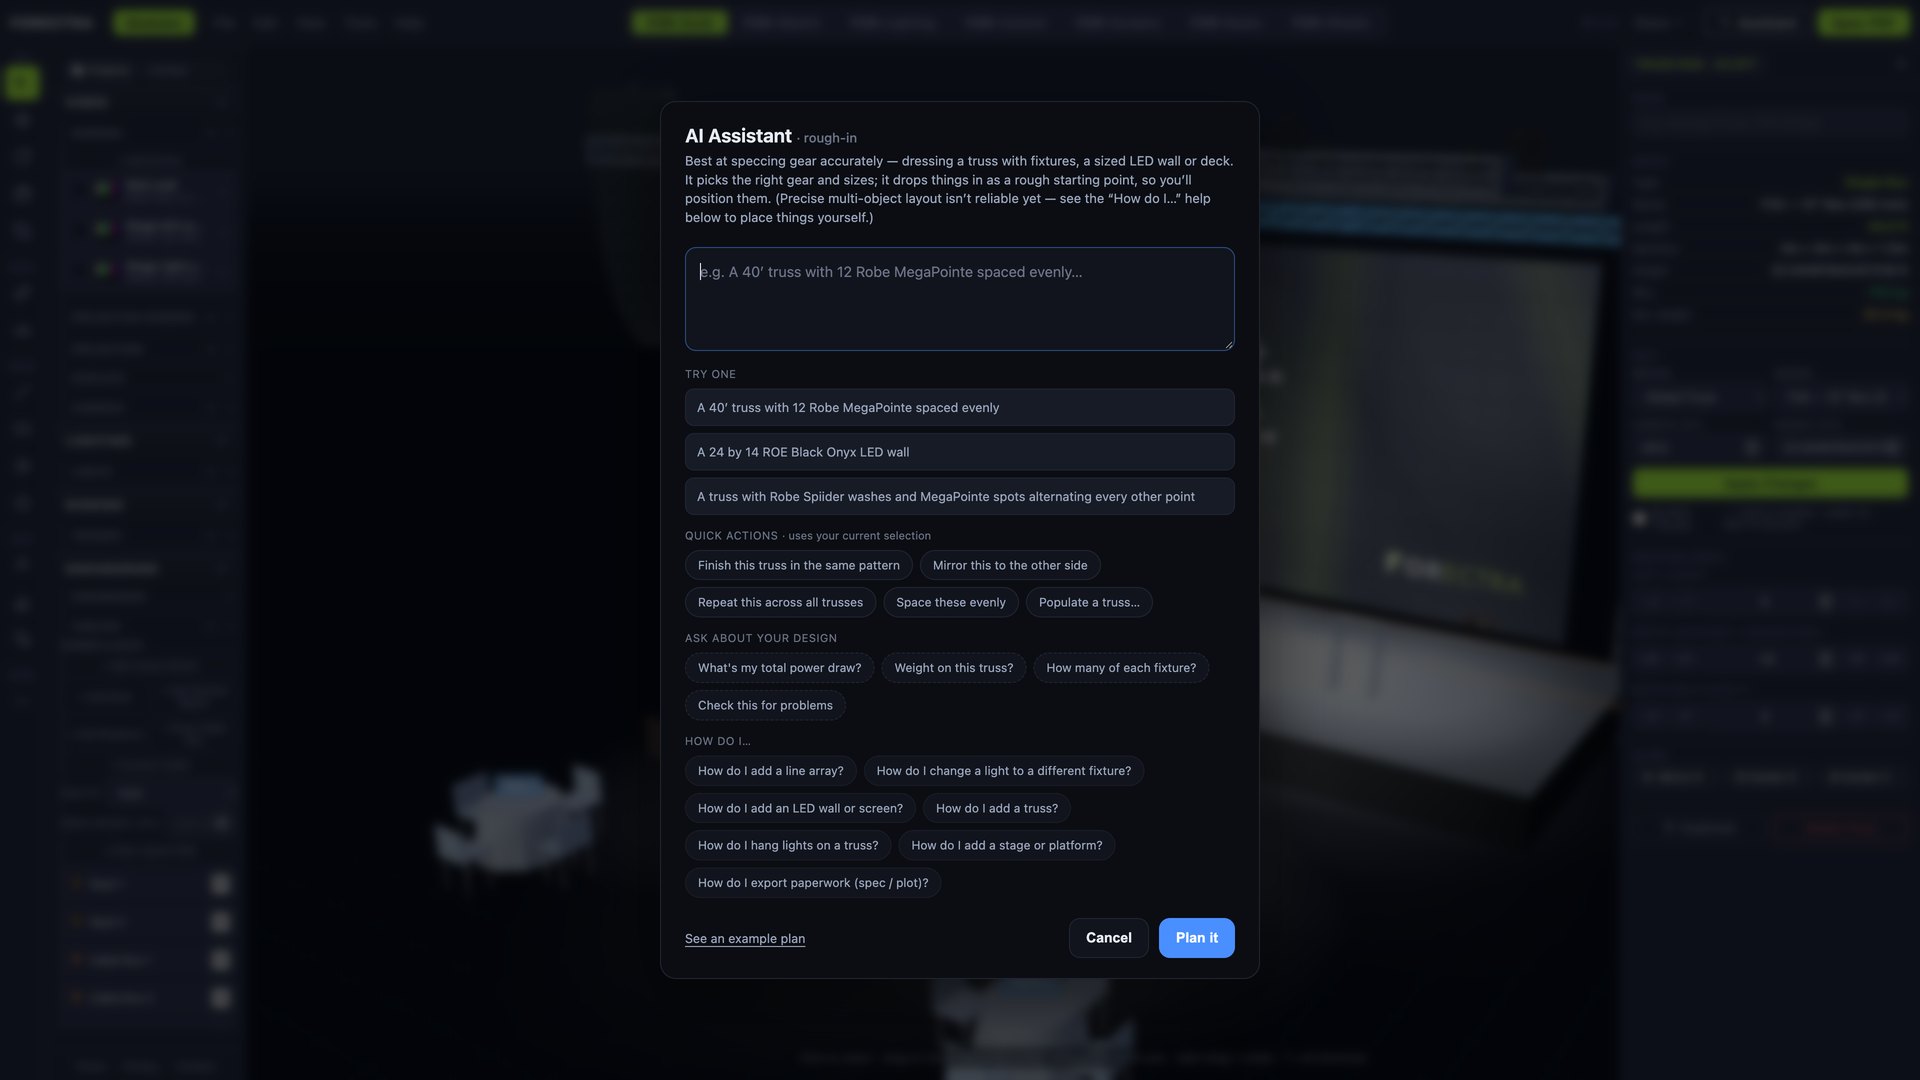
Select something, open Assistant, say what you want. "Mirror this truss", "finish this truss in the same pattern", "repeat this across all trusses", "space these evenly", "populate a truss…". It plans first, you press Build it. The ask chips: what's my total power draw, weight on this truss, how many of each fixture, check this for problems.
2.7 Venue and seating
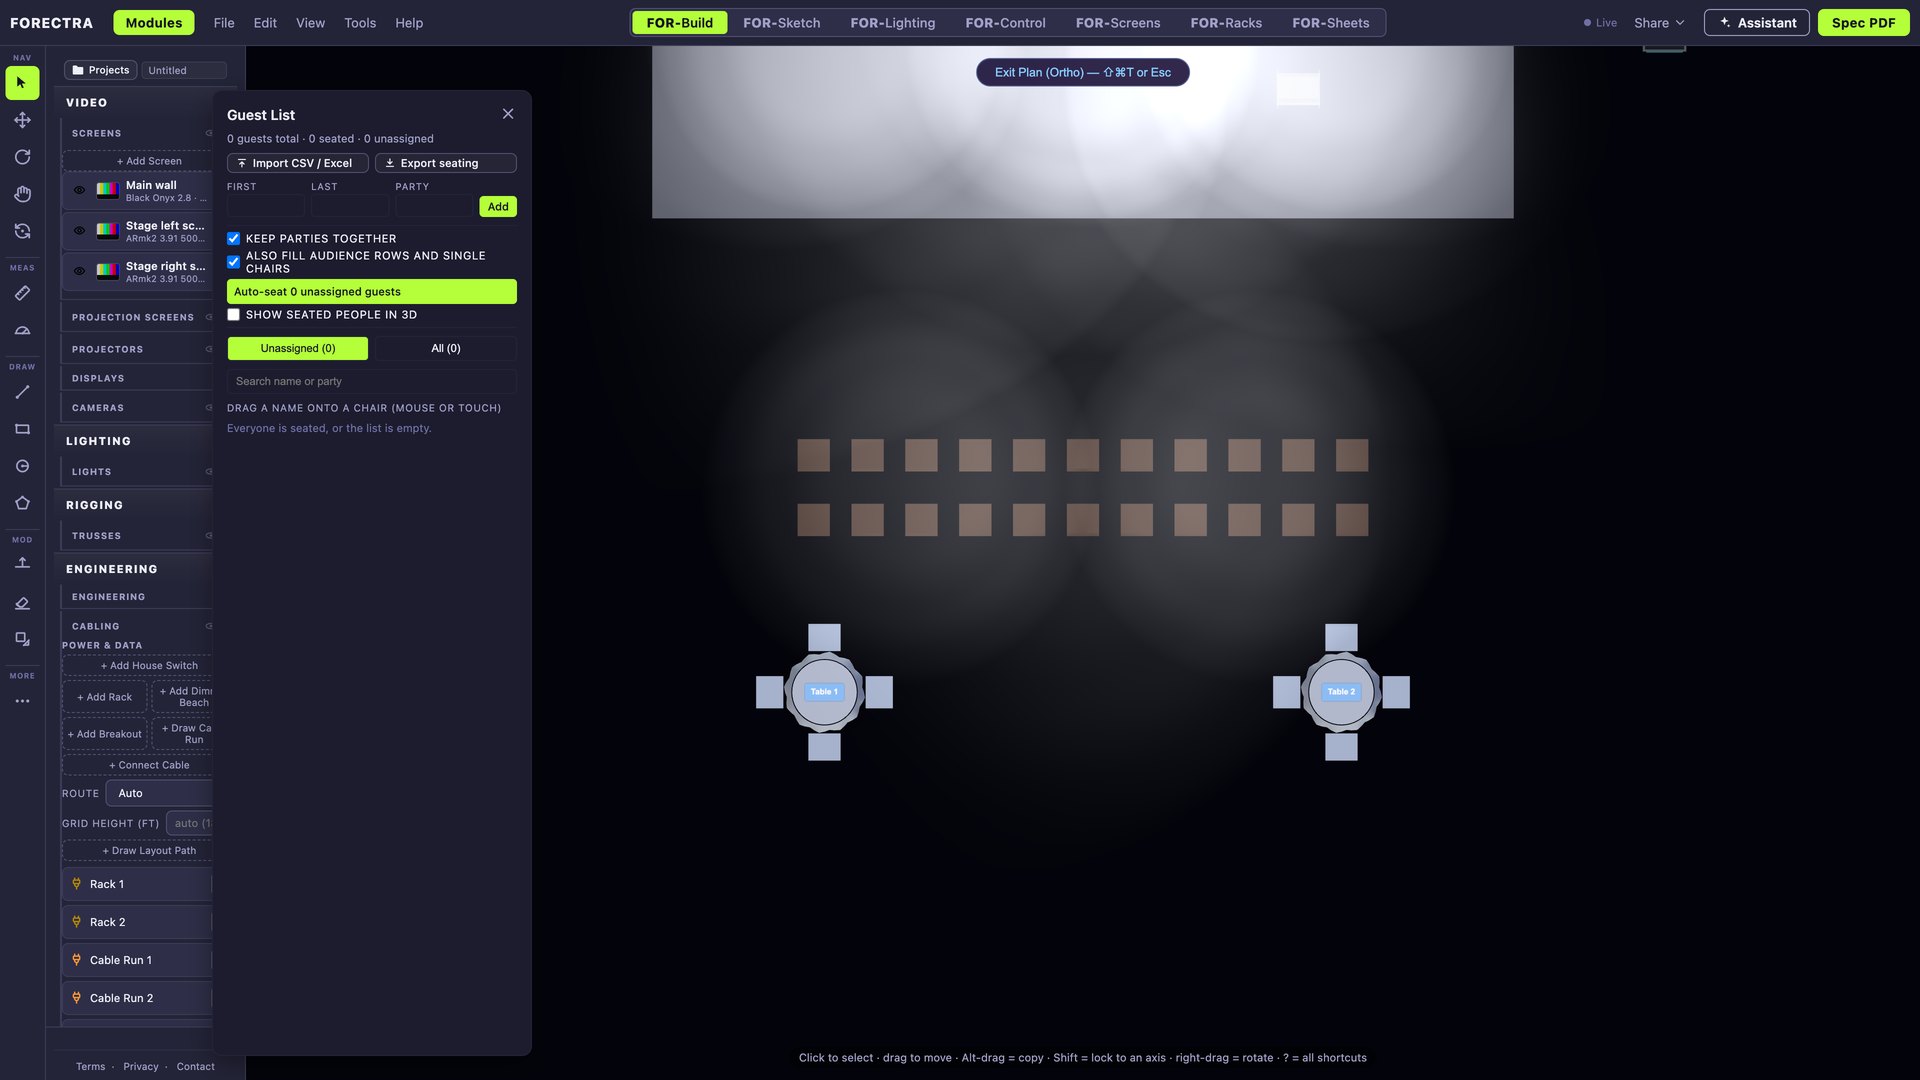
File → Import → 3D DXF drops a room plan in (units read from the file). Venue & Seating: draw a room, add doors and windows, + Add Table (round, banquet, cocktail; chairs follow), audience blocks, Guest List (import a CSV, Auto-seat; keep parties together; meal counts). It prints as a table schedule, a seating chart, place cards, a guest list and meal counts.
FOR-Sketch — model anything
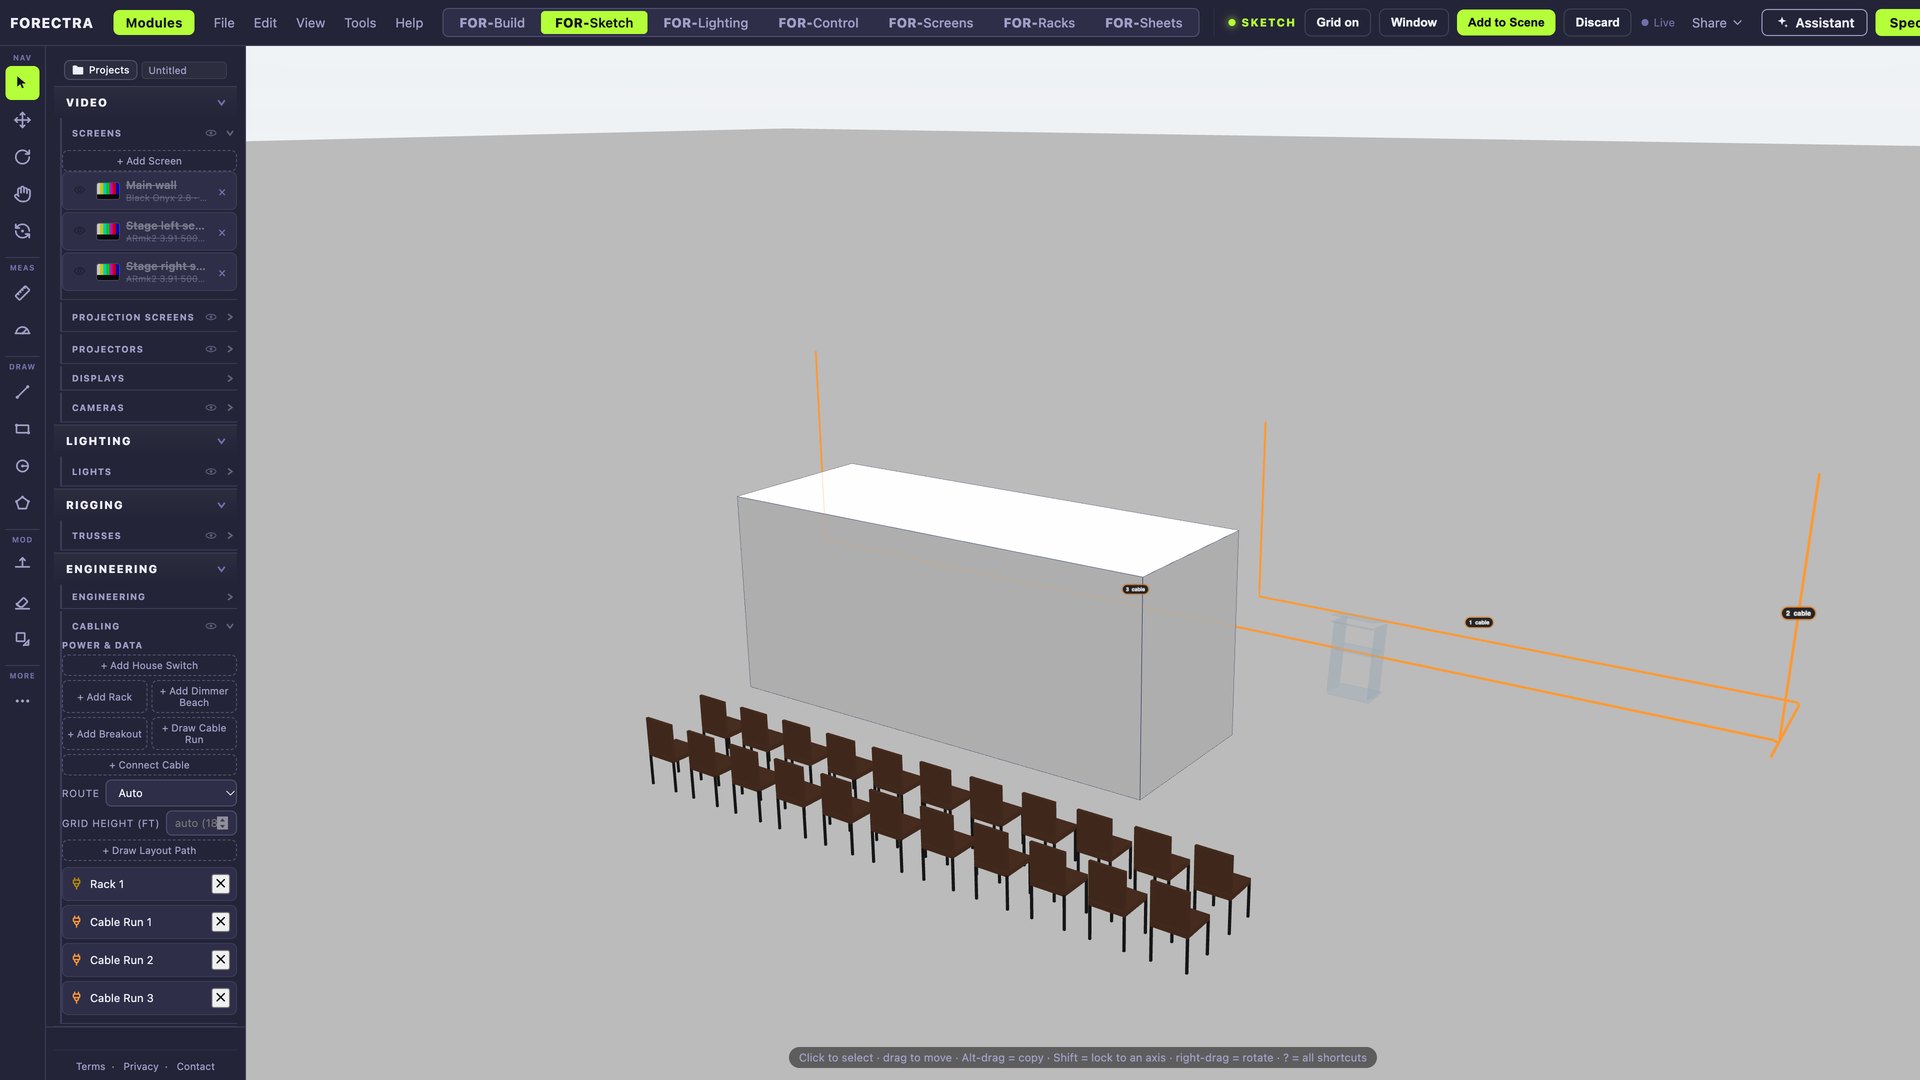
A clean white stage, SketchUp rules. Draw a rectangle (two clicks), P to push/pull it into a solid, type a size (24", 6', 2.5) and Enter to make the pull exact. Draw on any face; push in = recess, push through = opening, pull out = boss. Window cuts straight through a face. Offset, arc, polygon, circle, eraser, line. Group with the link button (nested groups allowed; double-click enters a group, Esc leaves). Add to Scene puts the piece on the real stage; Discard throws it away.
FOR-Lighting — the plot
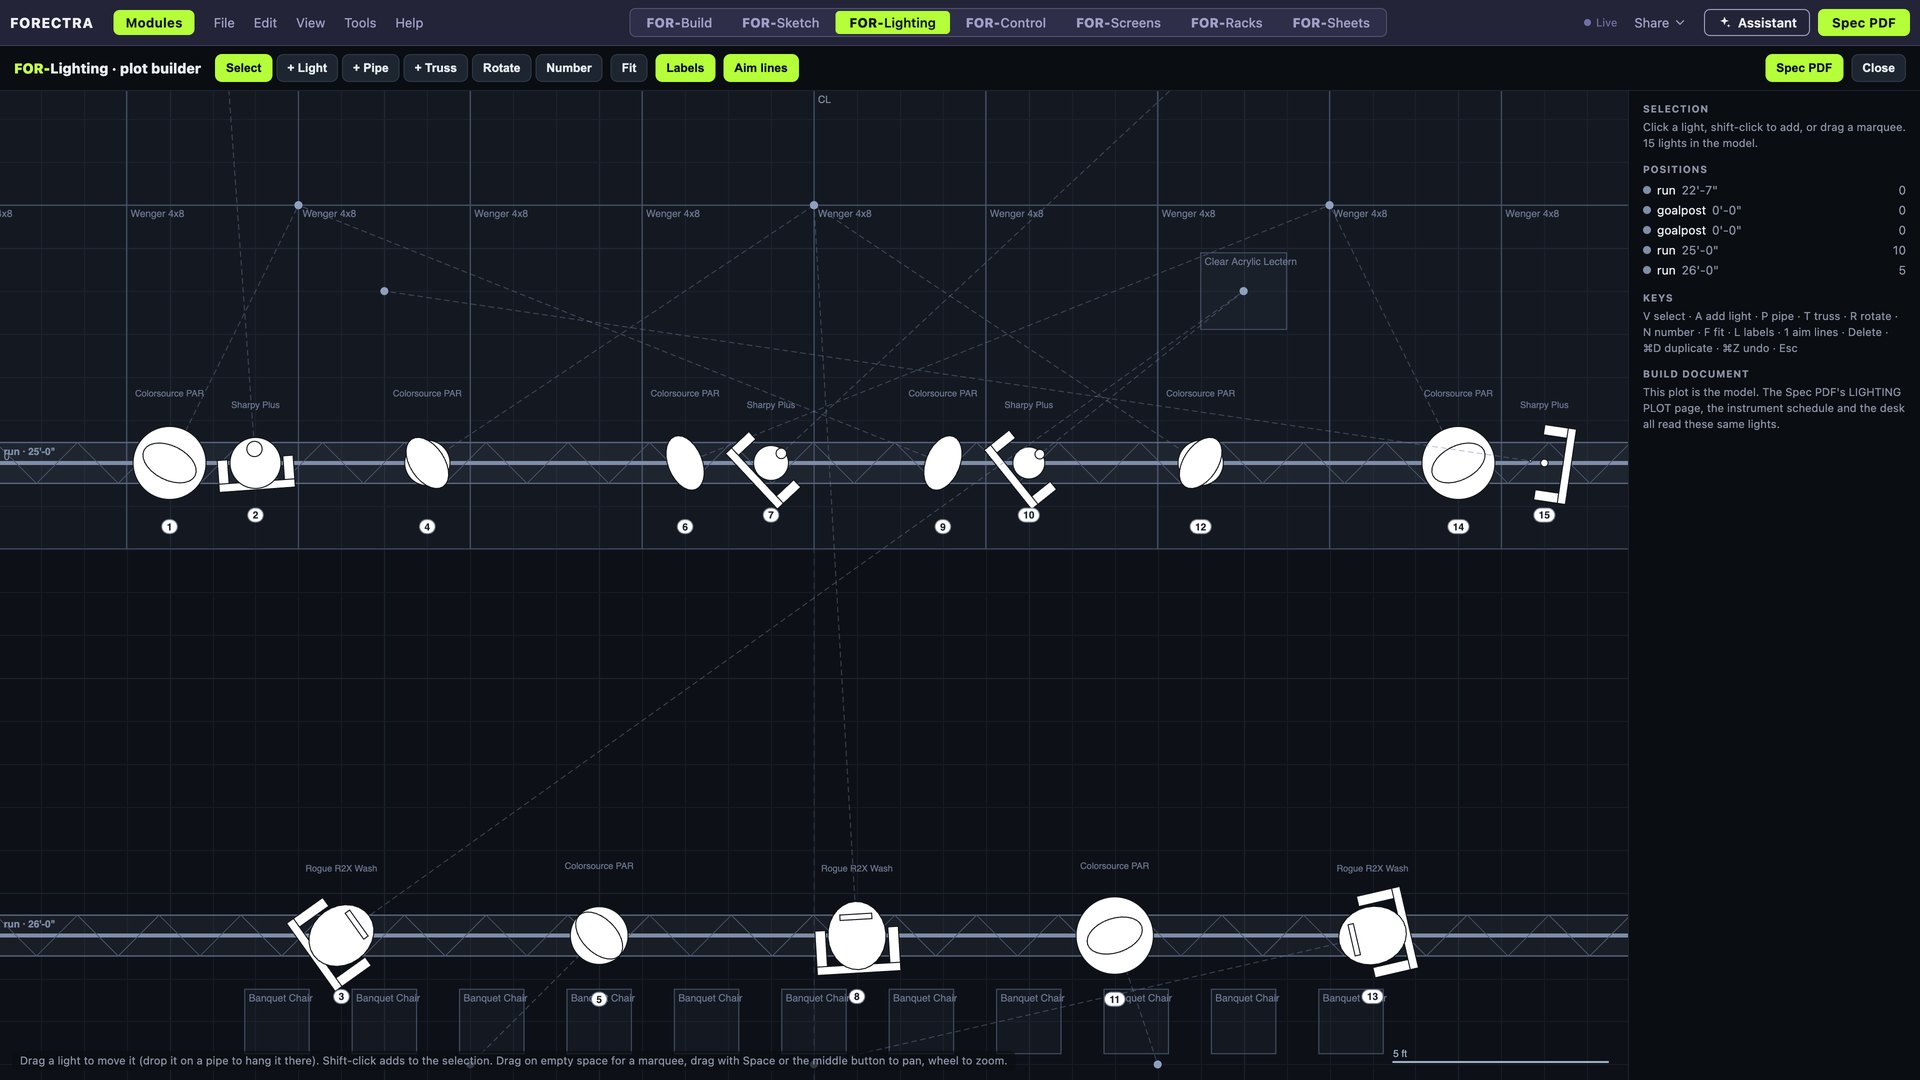
The plot is the same rig as the 3D, seen from above as a drawing. Fit frames it. + Light: click on a pipe node and it hangs there, click elsewhere and it sits at trim height; the library opens for the pick. + Pipe and + Truss: drag end to end. Select drags lights (drop one on a pipe node and it hangs). Rotate turns a light. Number: click lights in order to number them (the counter is on the right). Right-click a light: Move, Rotate, Aim (click where it should point), Duplicate, Properties, Delete. Labels shows channel, unit, purpose. AIM shows the focus lines. PDF prints the plot.
The paper plot (white, with symbol key, channel numbers, pipes) is a page of the Spec PDF.
FOR-Screens and FOR-Racks
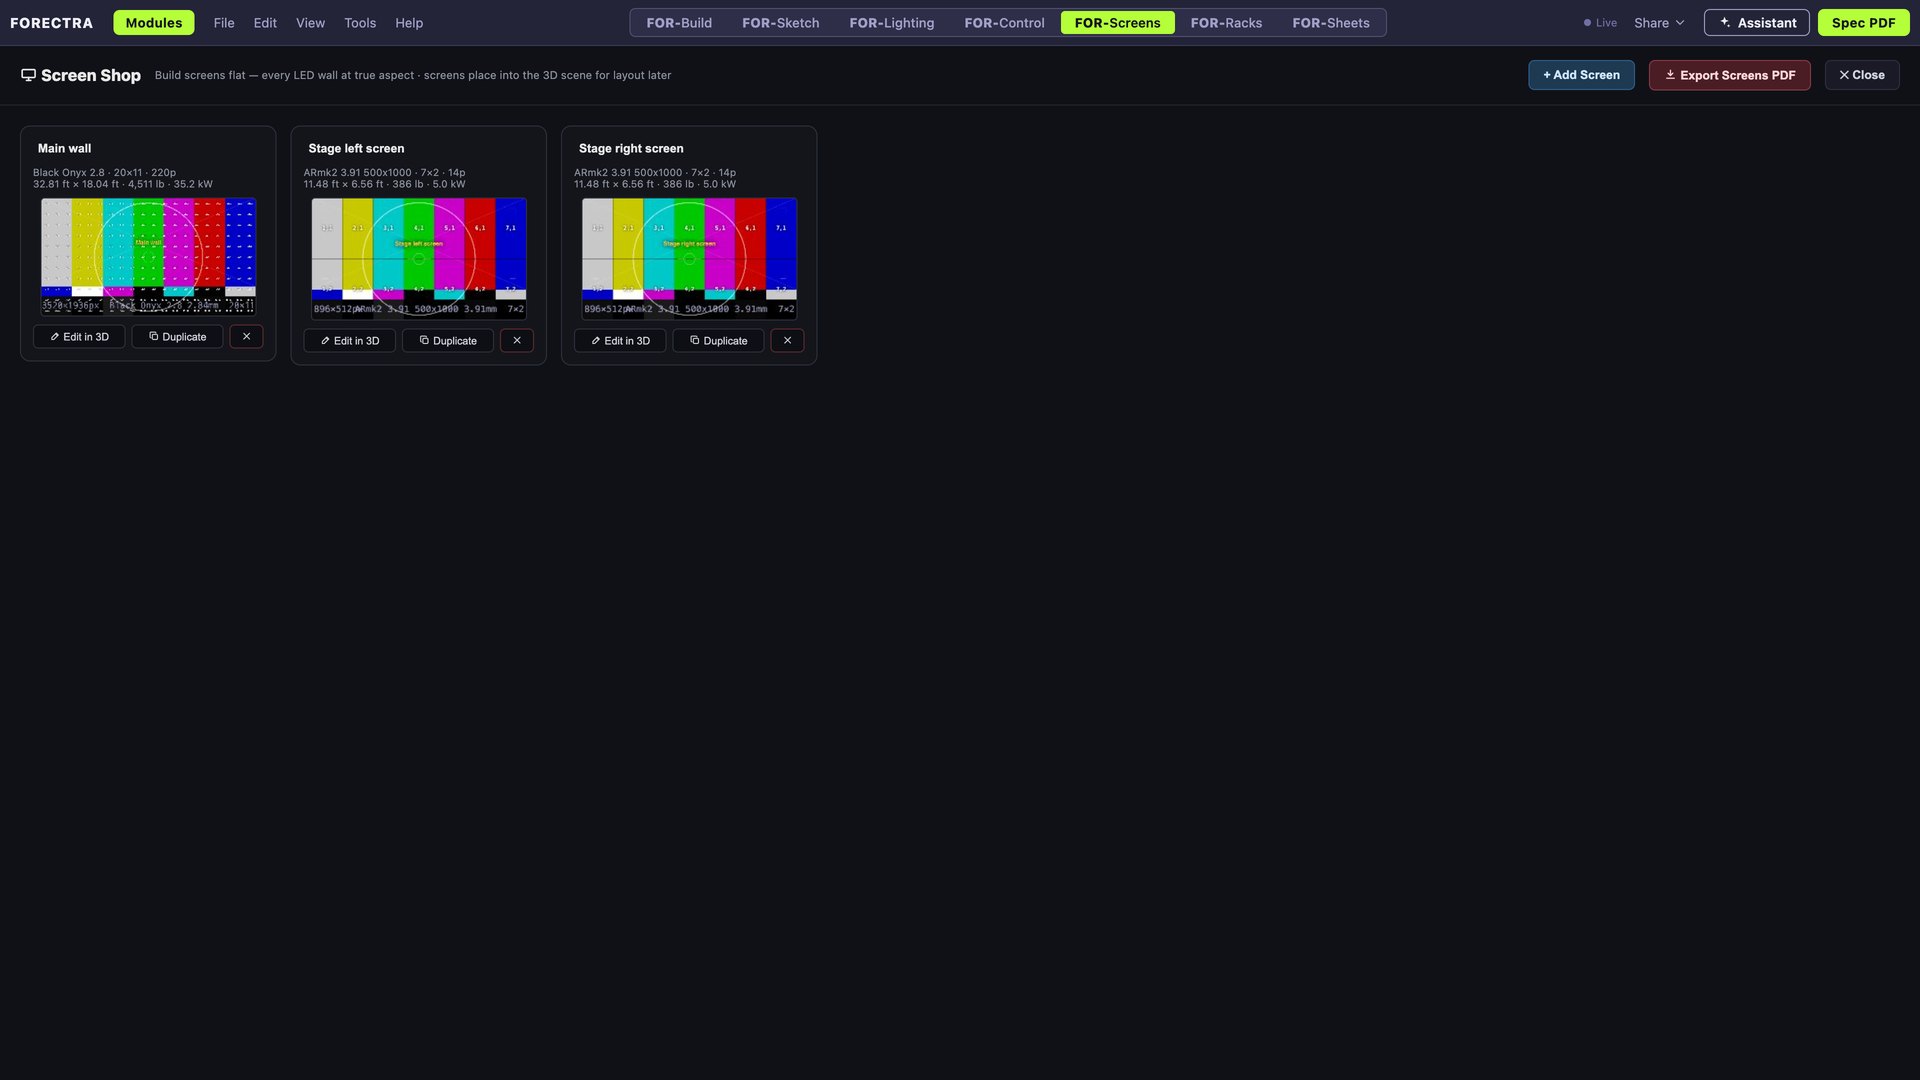
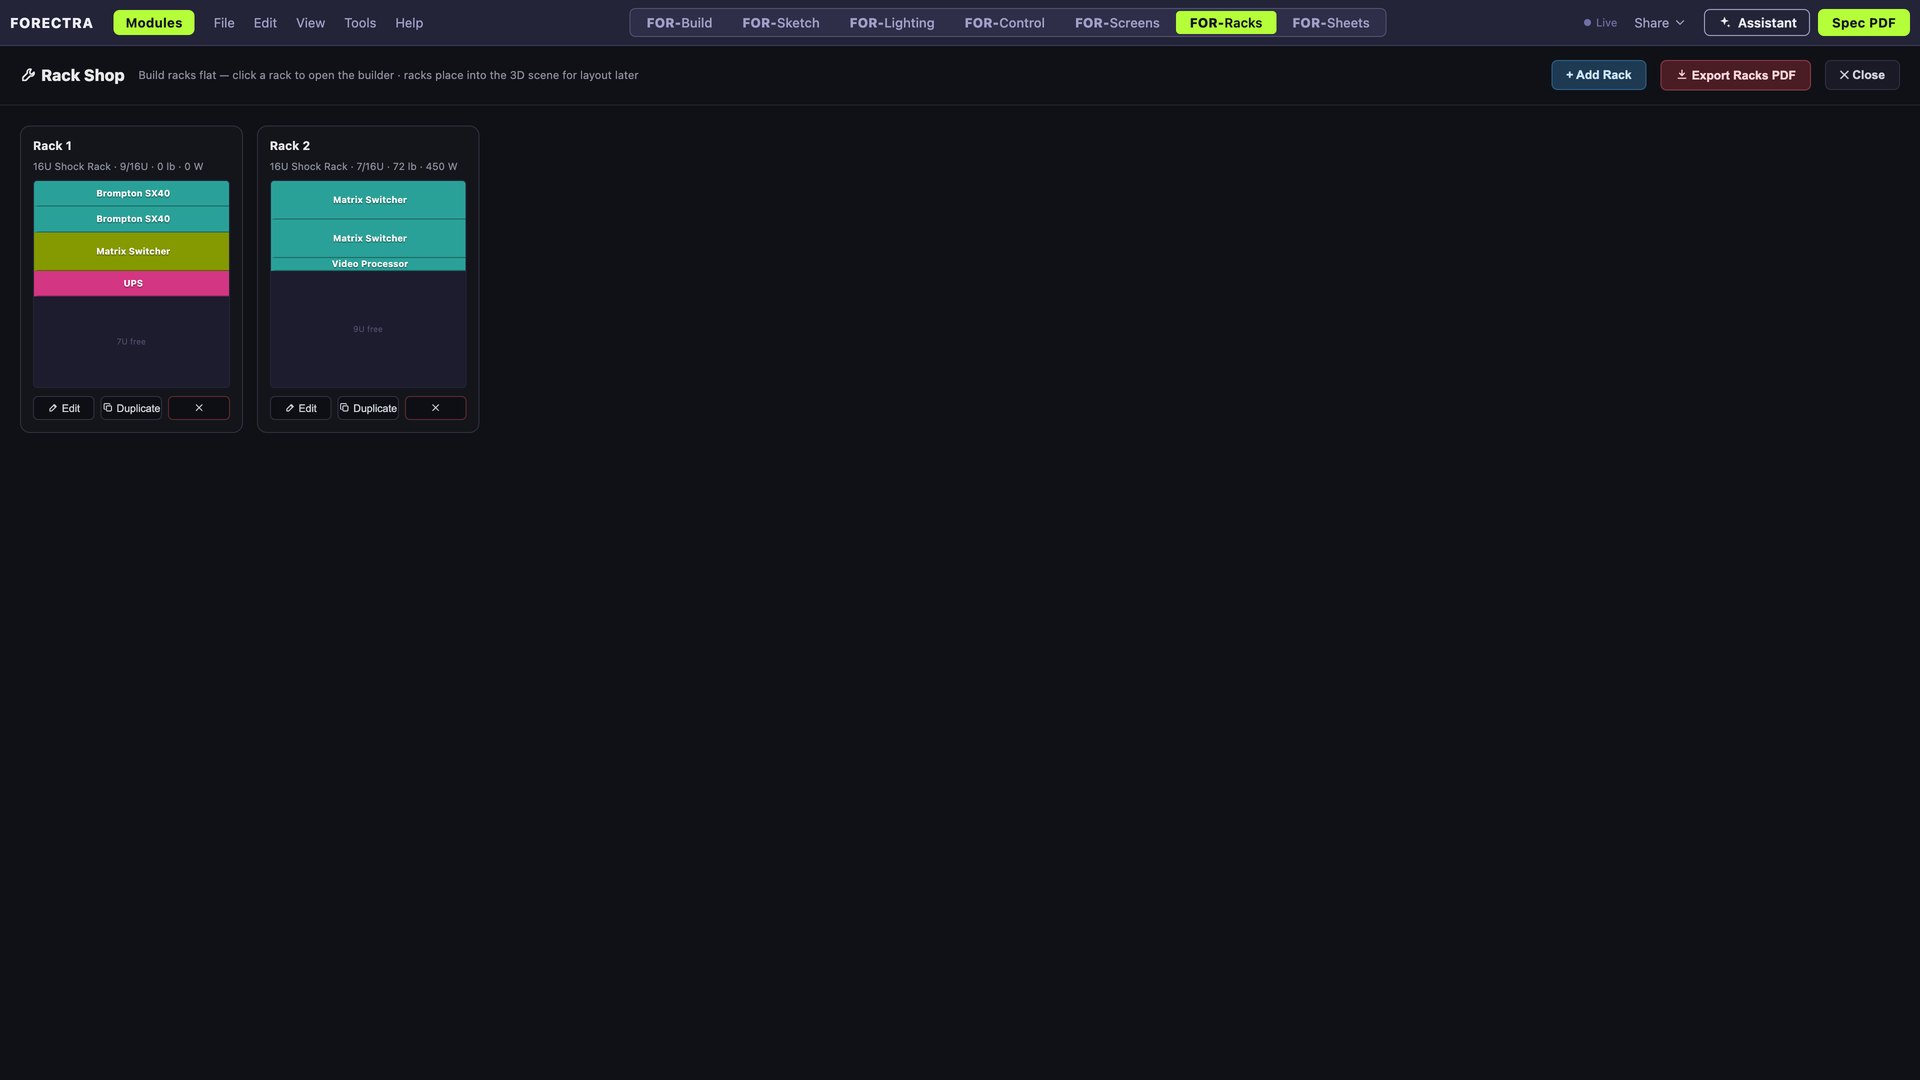
FOR-Screens lays every screen out flat at true aspect: rename, edit in 3D, duplicate, delete, or export a Screens-only PDF (wall tables, content spec, screen detail, cable diagram).
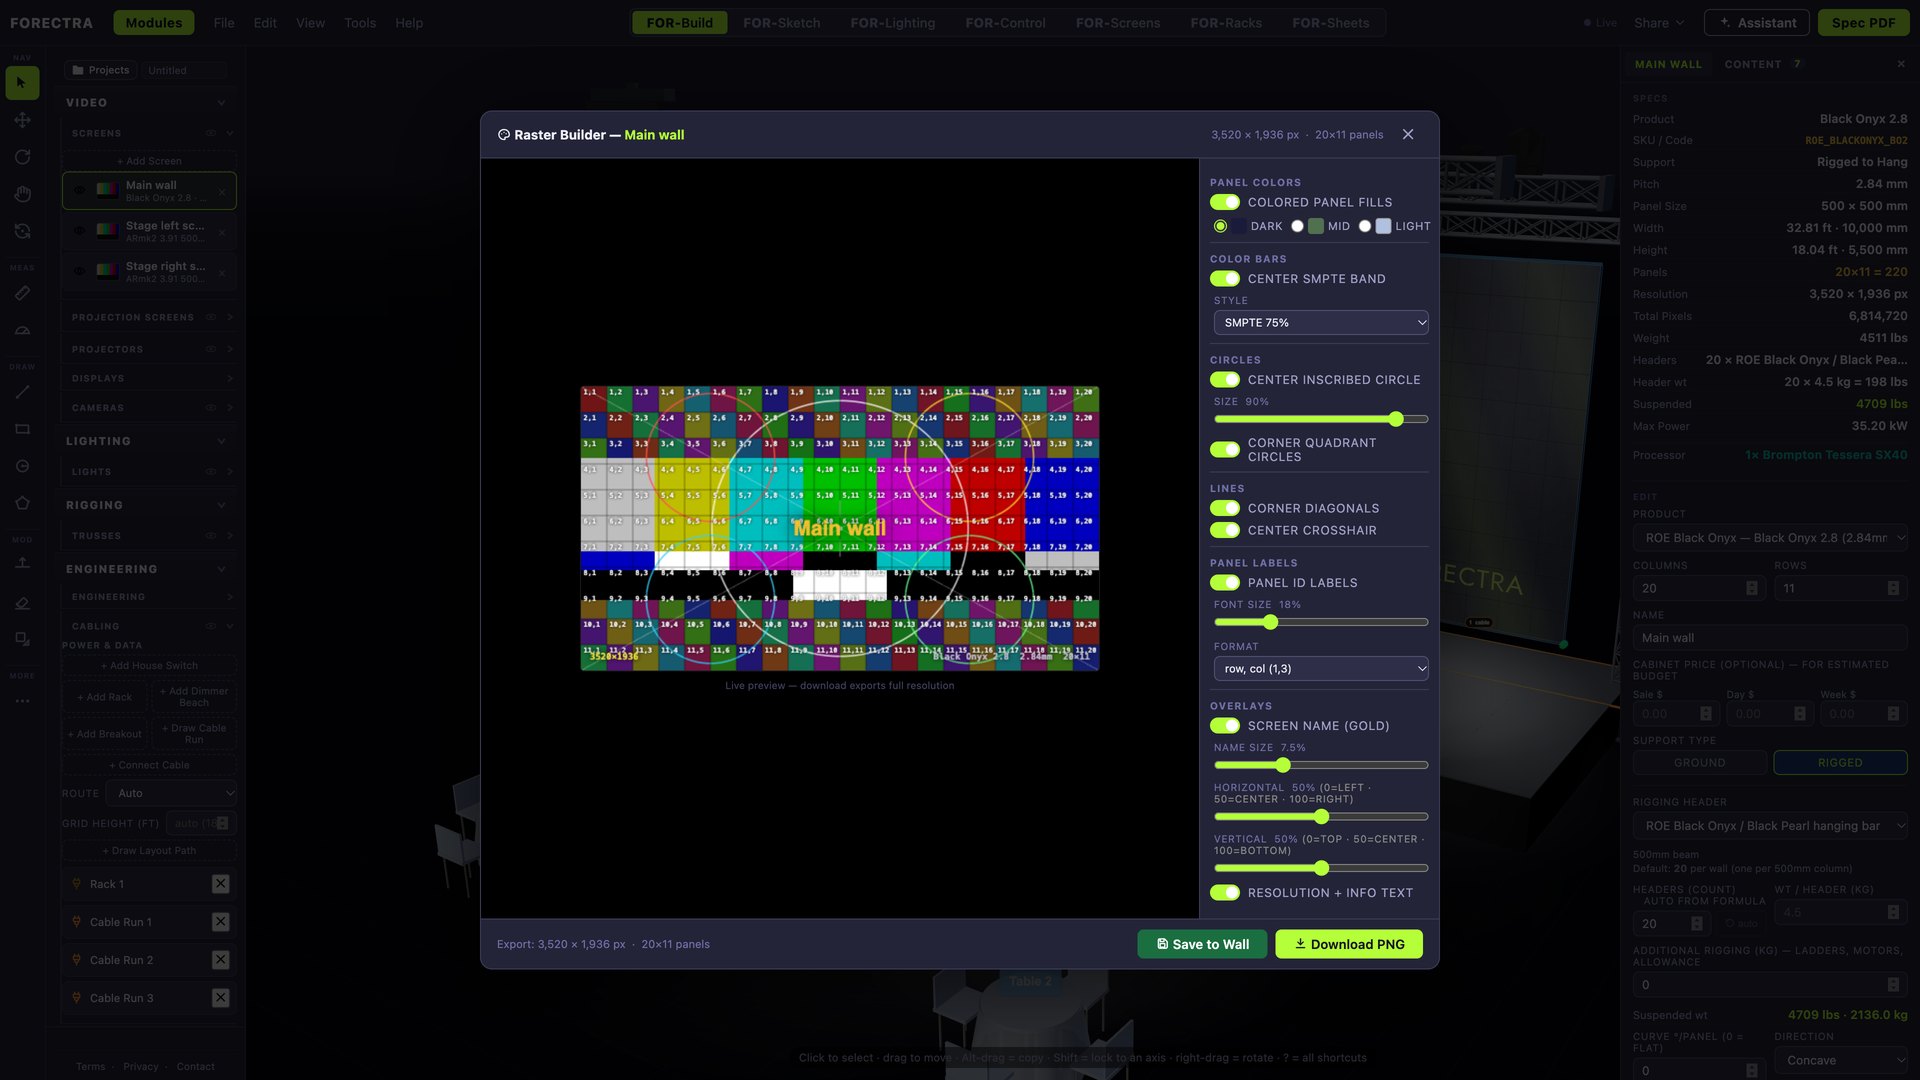
Tools → Raster Builder (or the button on a selected wall) makes the test card for a wall: panel colours, SMPTE bars, circles, diagonals, crosshair, panel numbers, centre label, resolution text. Save to Wall puts it on the wall in 3D; Download PNG gives the file for the processor.
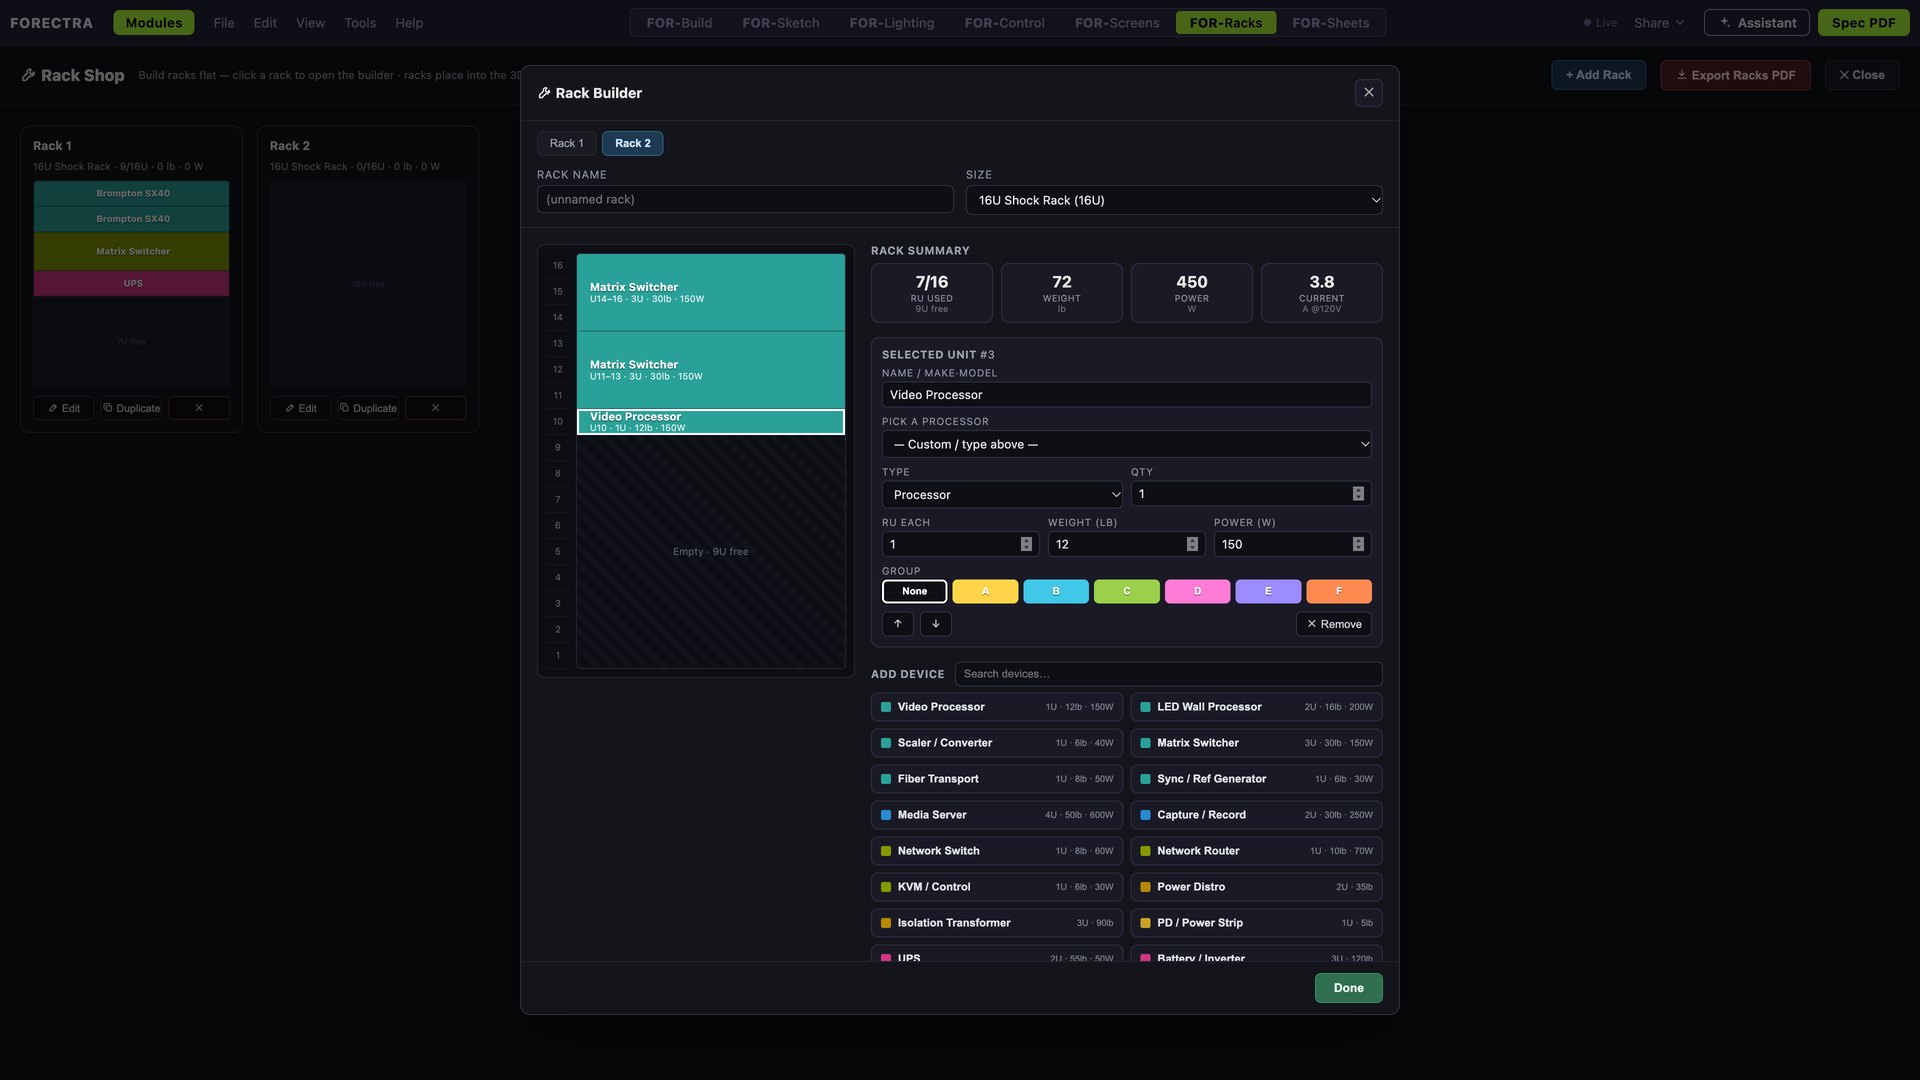
FOR-Racks: one strip per rack. + Add Rack opens the Rack Builder: search the device library (processors, switchers, servers, UPS, distros, audio, comms, RF), click a card and it lands in the next free U. RU, weight, power and current add up live. Drag a device to reorder. The rack prints as an elevation.
Paperwork: Spec PDF, Plan layout, Sheet Composer
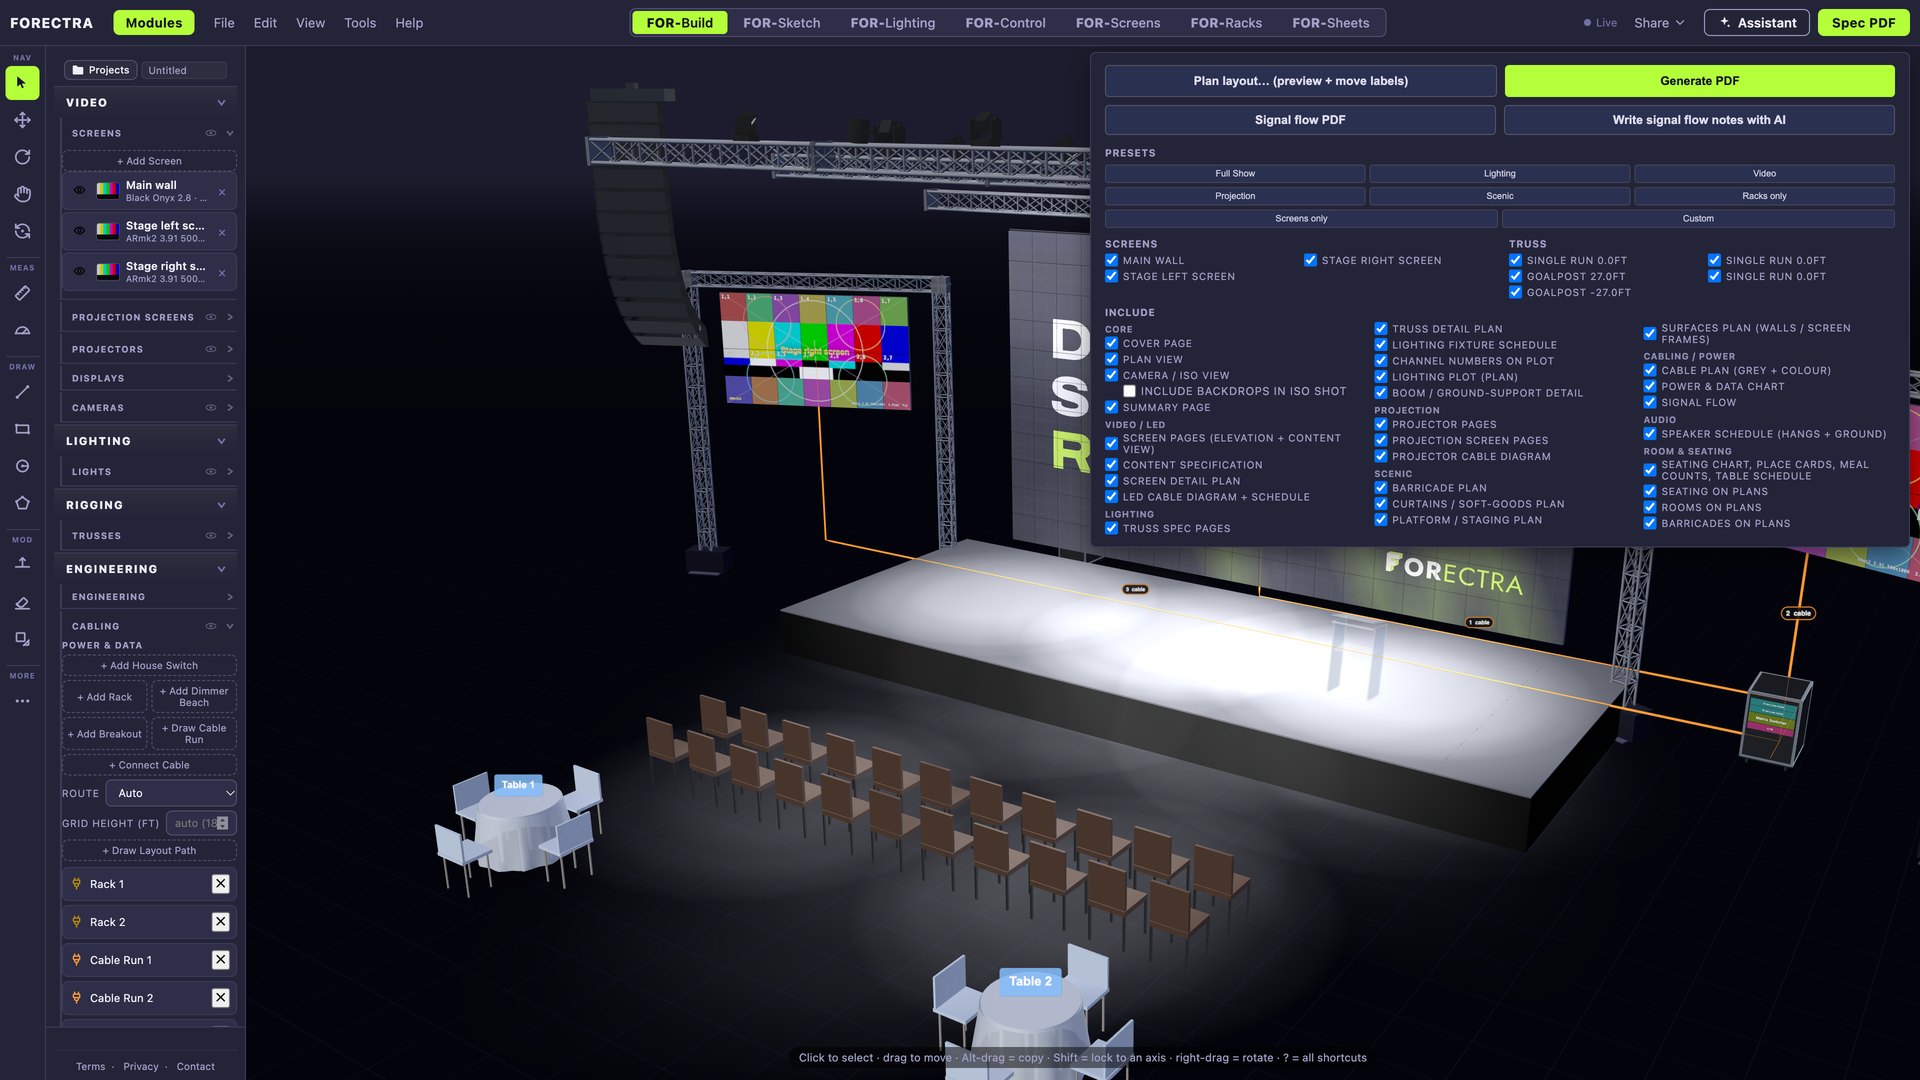
Spec PDF (top right) → pick a preset or the pages → Generate PDF. The full set on the demo show is 36 pages: system summary, each screen's spec sheet and rear cable diagram, content spec, truss and support, fixture schedule, channel hookup, symbol keys, platform schedule, cable plan, signal flow and cable schedule, power & data, rack elevations, speaker schedule, table schedule, seating chart, place cards, guest list, meal counts, scene overview. Modules that are off leave their pages out.
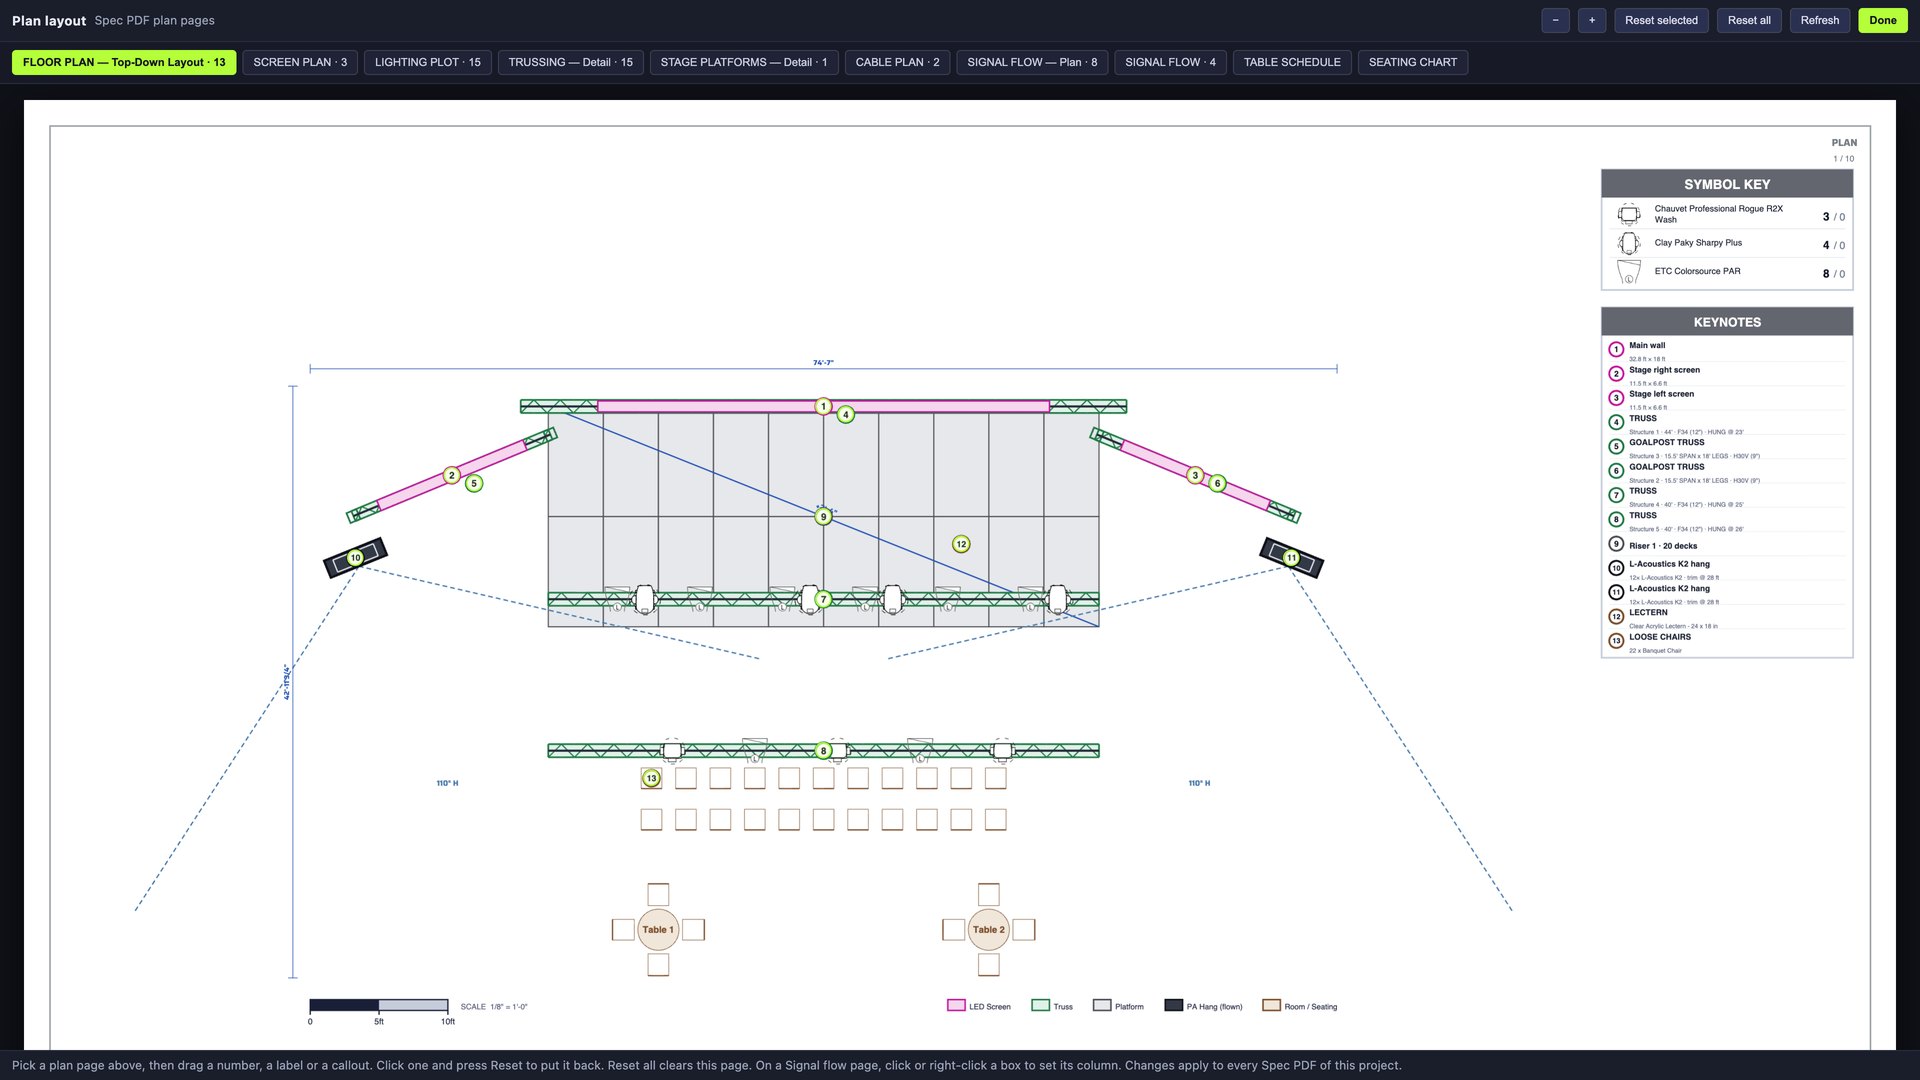
File → Export → Plan layout…: the plan pages with their keynotes, labels and callouts as handles. Drag any of them where you want it; Reset puts one back, Reset all clears the page. Saved with the show; the PDF follows it.
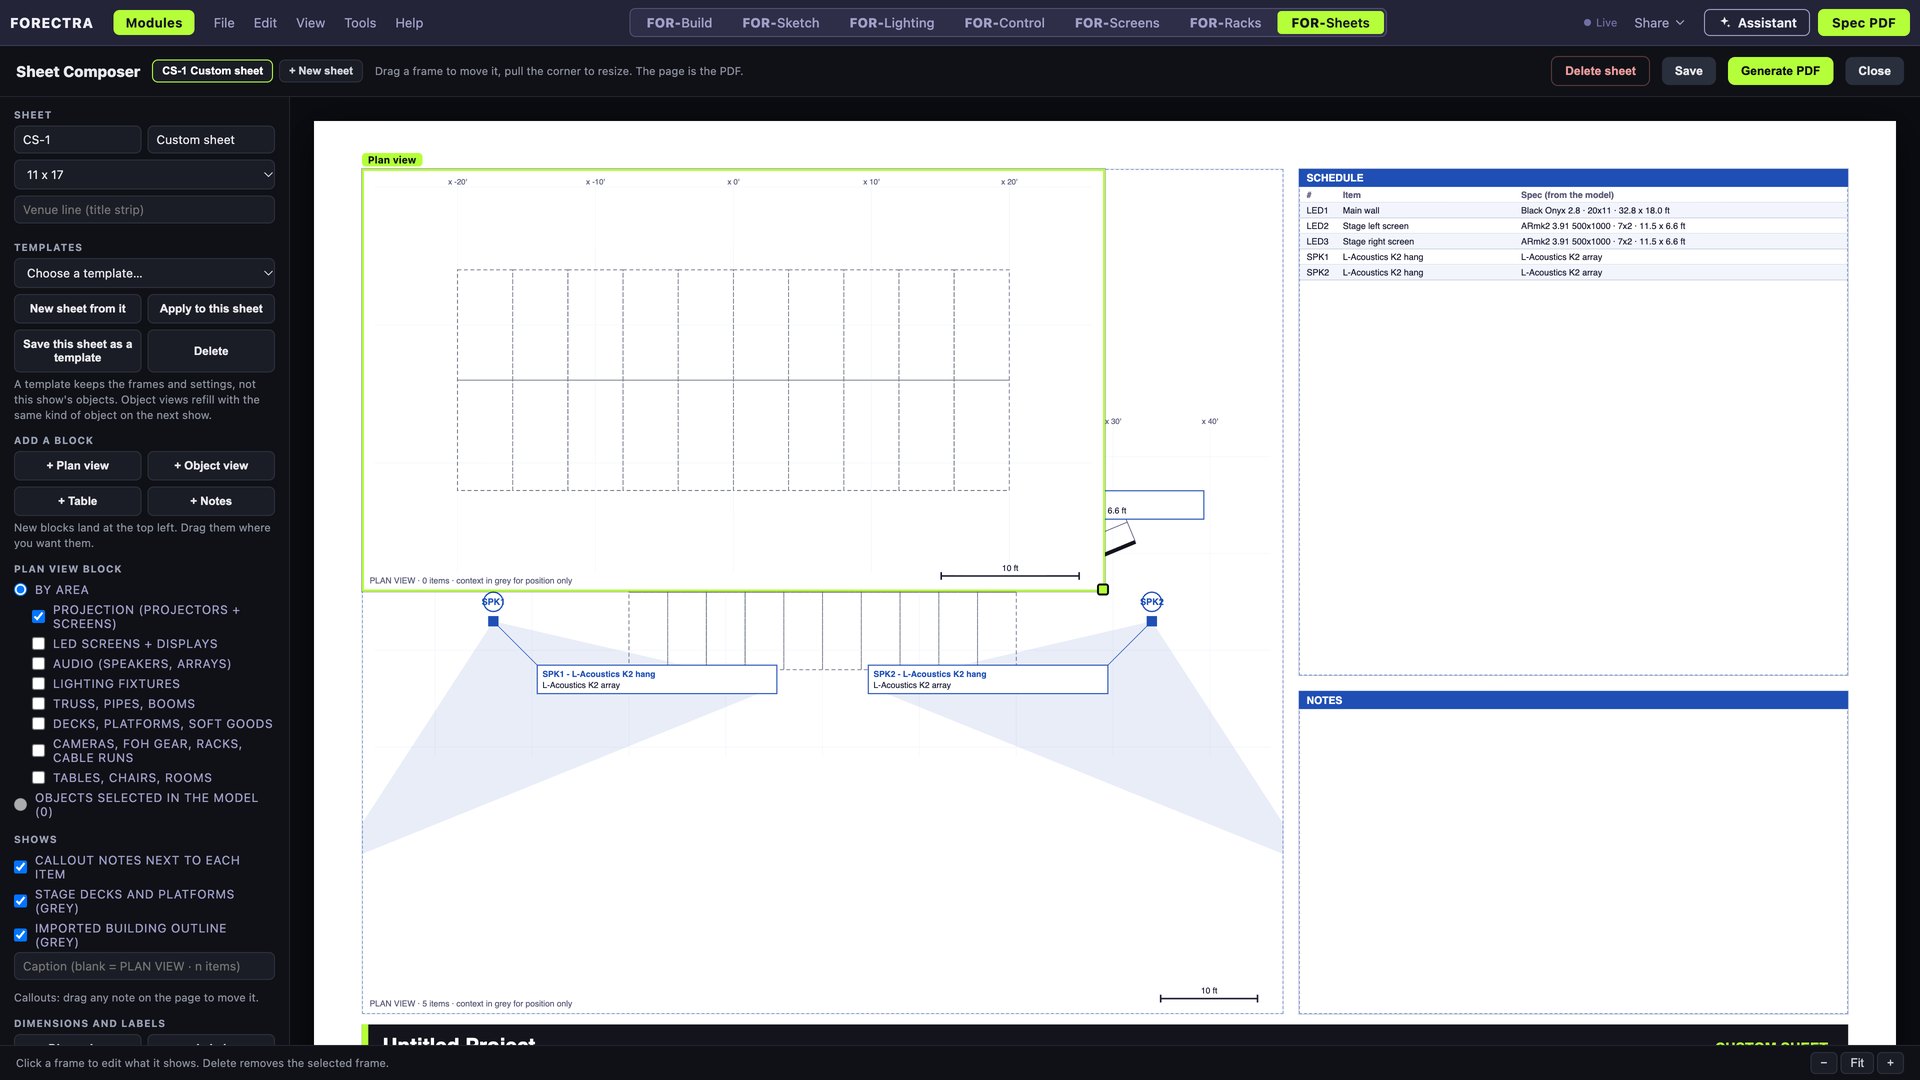
FOR-Sheets (Sheet Composer): your own plates. A sheet is a page (Letter, 11 × 17, 24 × 36 ARCH D) with a title block. Add blocks: + Plan view, + Object view (front, top, side, iso, section of anything in the show, with dimensions), + Table, + Notes. Drag a frame to move it, pull its corner to resize. Templates: the Scenery sheet gives front, top, side, iso and section of a selected piece in one go; save your own. Generate PDF prints the sheet. The labels tool moves callouts by hand; the dims tool adds dimensions.
FOR-Control — the desk
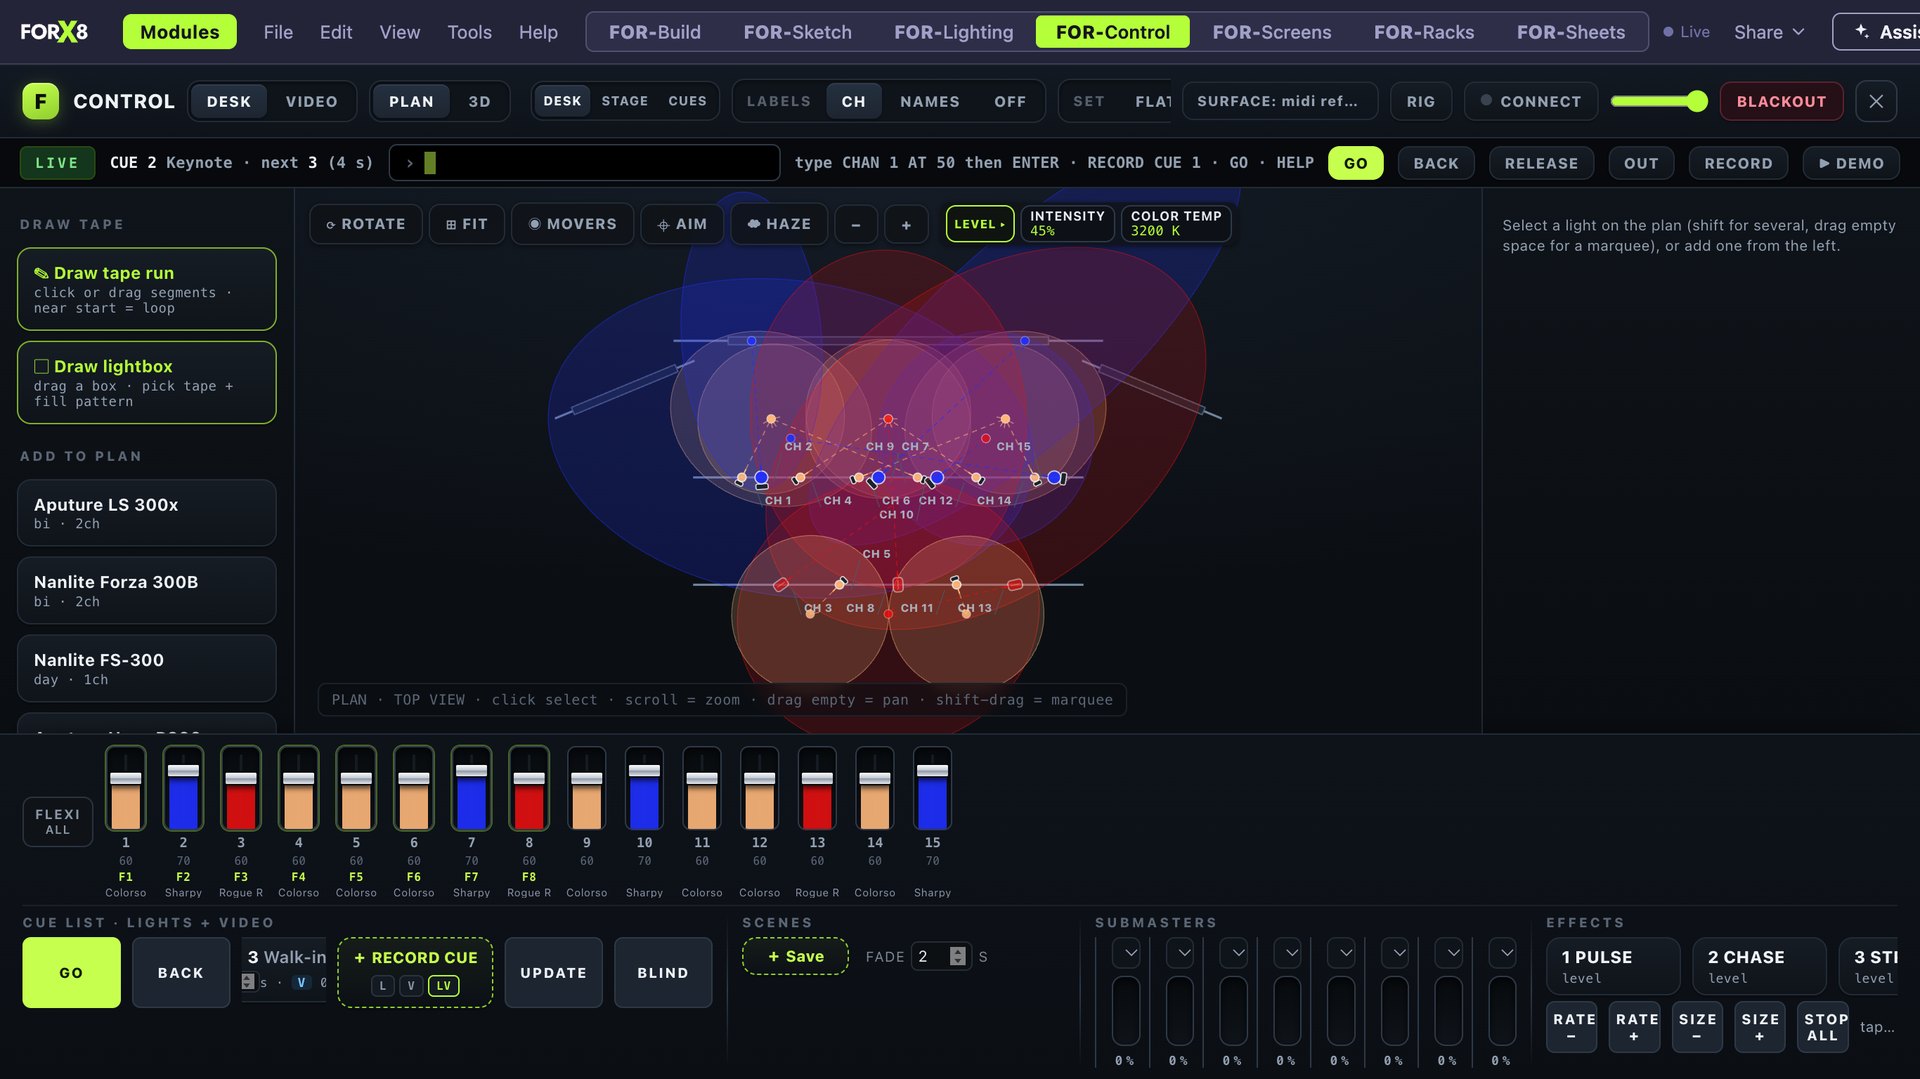
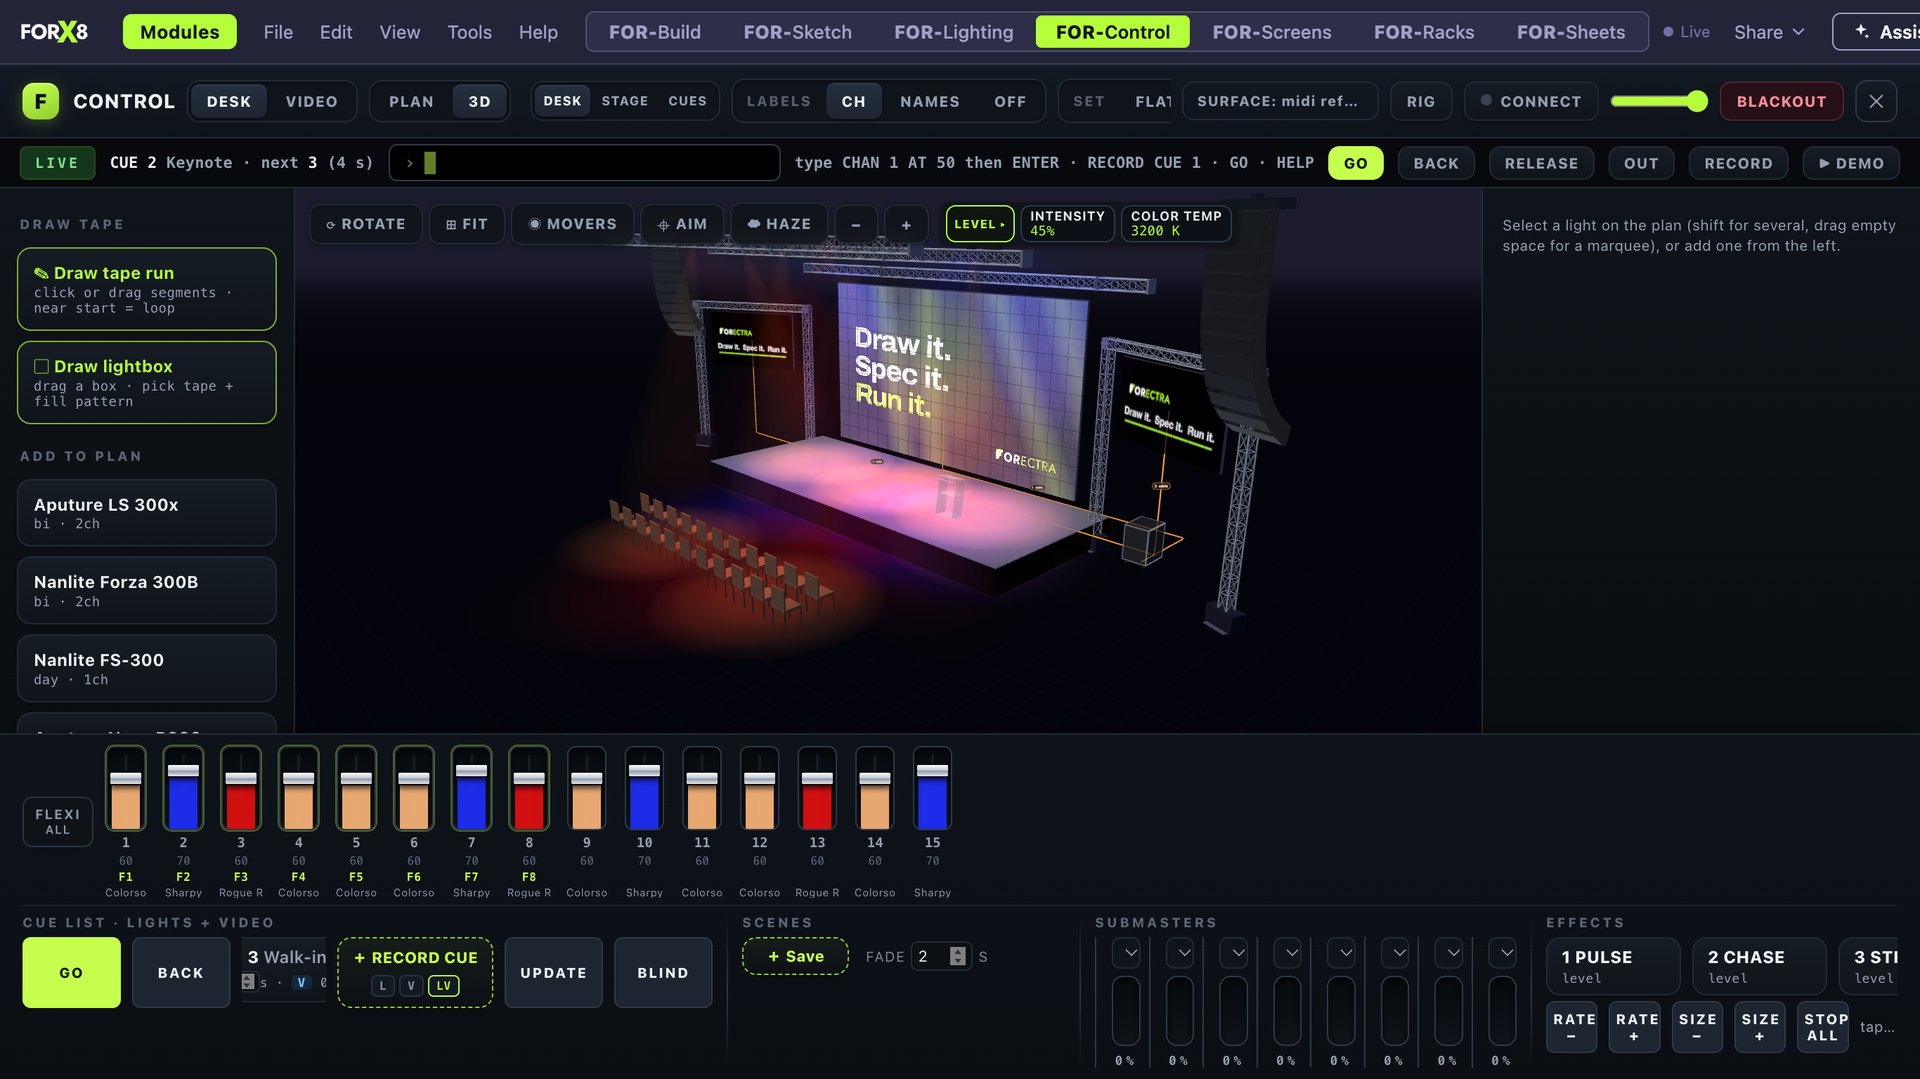
FOR-Control is an Eos-style desk in the same file as the drawing. Open it with the FOR-Control tab (on the box it is the home screen). Three parts: the head (DESK | VIDEO, PLAN | 3D, DESK · STAGE · CUES layout, labels, surface, RIG, CONNECT, master, BLACKOUT), the command bar (LIVE/BLIND, the current cue, the command line, GO BACK RELEASE OUT RECORD DEMO), and the body: the stage (plan or 3D) with the tech panel on the right, and the bottom strip (faders, cue list, scenes, submasters, effects).
7.1 The command line
Just type. Words or numbers, Enter runs it. Esc clears it. Everything the desk does has a word:
| Type | It does |
|---|---|
CHAN 1 THRU 8 AT 50 · 1 THRU 8 AT 50 |
levels. [TIME 3] fades them |
3 FULL · 5 OUT |
full, out |
1 + 4 AT 30 · 1 THRU 8 - 4 AT 30 |
and, except |
RECORD CUE 5 |
the next cue (or cue 5). [TIME 3] [FOLLOW 2] [HANG 1] [LABEL words] |
RECORD CUE 5 LIGHTS · … VIDEO · … BOTH |
what the cue carries (the L / V / LV chips under RECORD CUE set the default) |
CUE 5 · GOTO CUE 5 TIME 0 |
go to a cue (in its time, or a cut) |
CUE 5 TIME 4 · CUE 5 FOLLOW 2 · CUE 5 LABEL Keynote |
edit a cue |
GO · BACK |
next cue in its time · previous cue in 1 s, no follow |
UPDATE |
the stage into the current cue |
DELETE CUE 5 |
|
BLIND · BLIND CUE 5 · LIVE |
edit a cue without touching the stage, and back |
SNEAK [TIME 2] |
manual levels back to the cue |
RELEASE [TIME 1] · CUE OUT |
manual off · everything off |
RECORD SUB 3 · SUB 3 AT 80 |
a submaster from the stage, its level |
LOAD 3 SUB 2 · LOAD 3 GM · FLEXI SEL |
what a fader is (CH, SUB, GM, FX, TIME, XFADE) · the fader bank = the selection |
EFFECT 6 [RATE 50] [SIZE 150] [SPREAD 100] · EFFECT 6 STOP · STOP EFFECT · EFFECT LIST |
the 16 effects |
MOVERS · AIM · AIM AT 10 -4 |
select every mover · aim mode · aim at a stage point |
HAZE · HAZE 70 |
the beams |
LOCK · DIM 10 |
lock the console · idle dim after n minutes |
HELP |
this list |
7.2 Cues
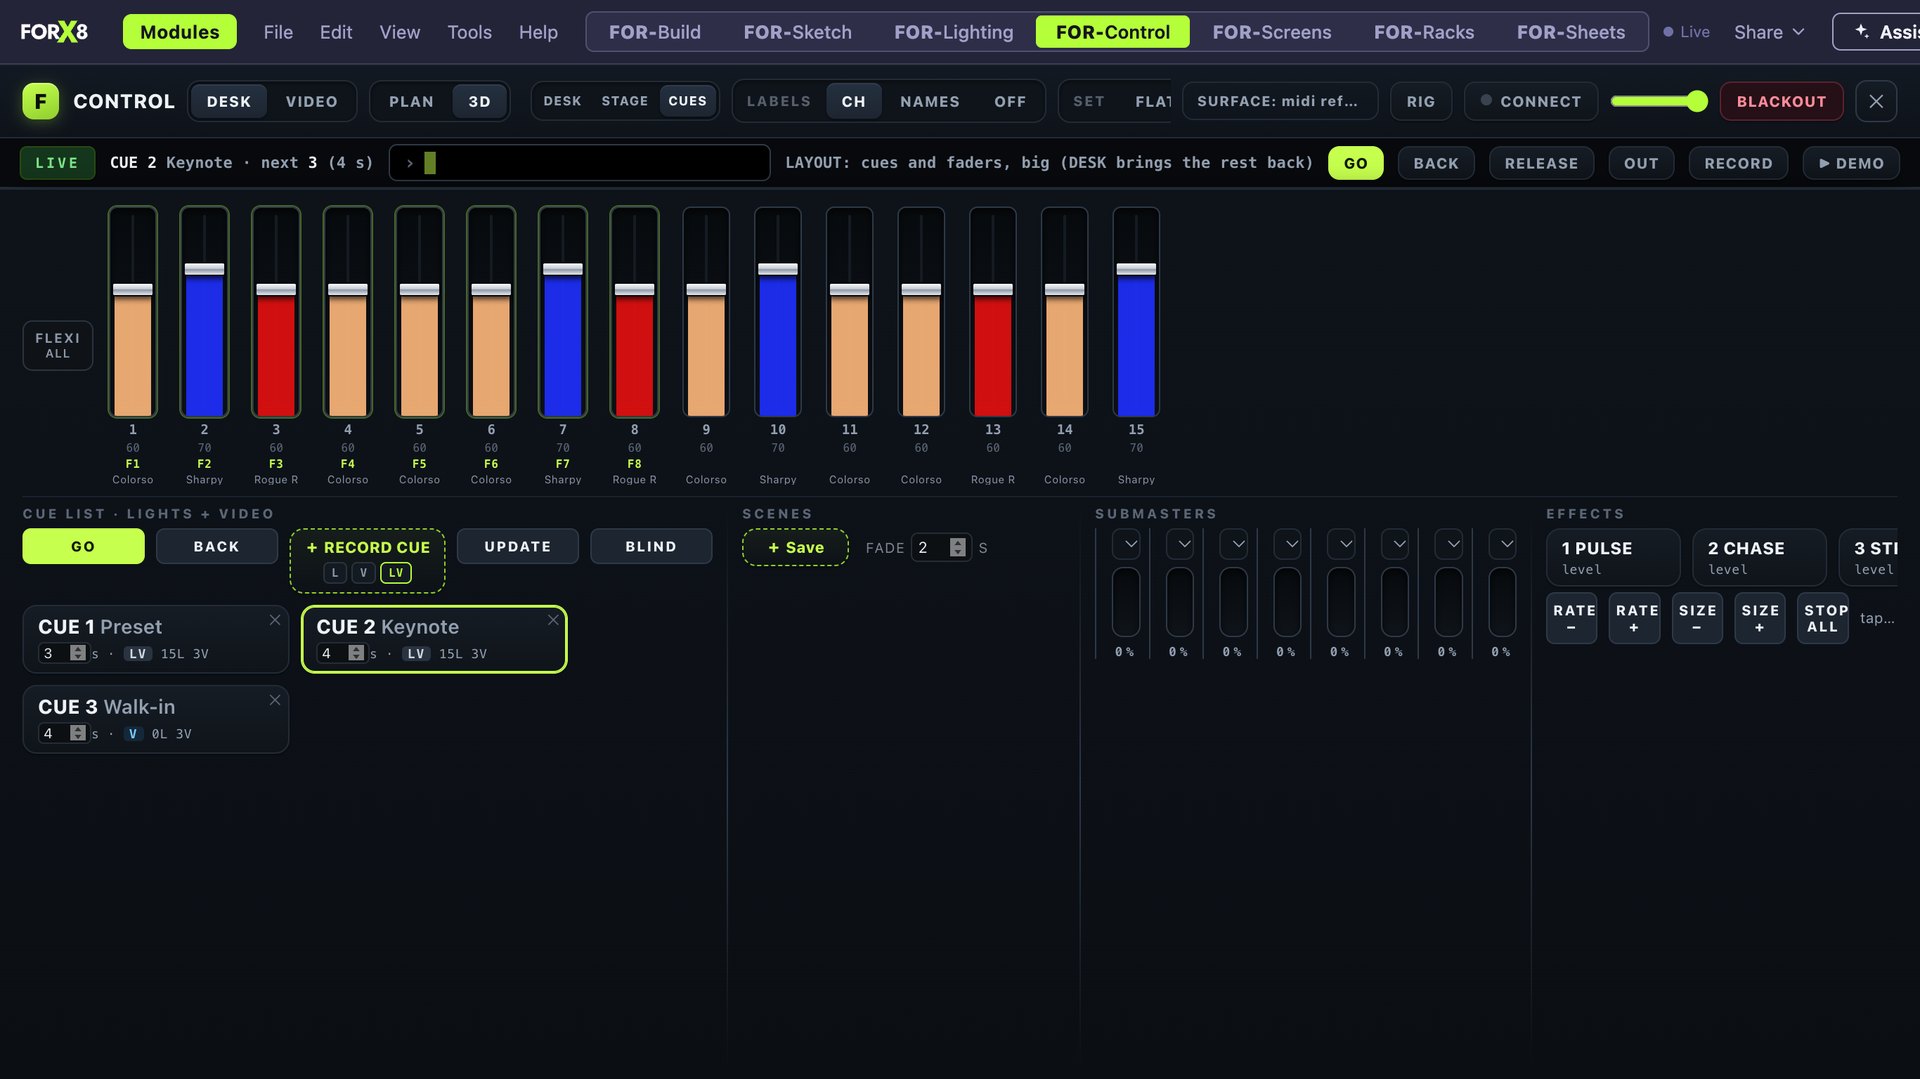
RECORD CUE records the stage. What it records is the chip under the RECORD CUE tile: L lights only, V video only, LV both. The cue list shows each cue's tag. GO moves only what the cue carries: a lights cue never touches the screens, a video cue never touches the lights. A cue owns every light: a light the cue never recorded goes out with the cue, like a real board. Follow and hang chain cues by time. BLIND edits a cue's levels while the stage stays; SNEAK releases a hand change back to the cue.
7.3 Faders, submasters, master, blackout
The bottom strip has the channel faders (the bank steps through the rig; on the box, the eight real faders are the bank). Each fader can be loaded with something else (LOAD n …): a sub, the master, an effect's rate, the TIME scale, a crossfader. Submasters add on top of the cue, highest wins (HTP). The master scales everything; BLACKOUT is a 2-second fade on the master and back.
7.4 Colour, gels, tint
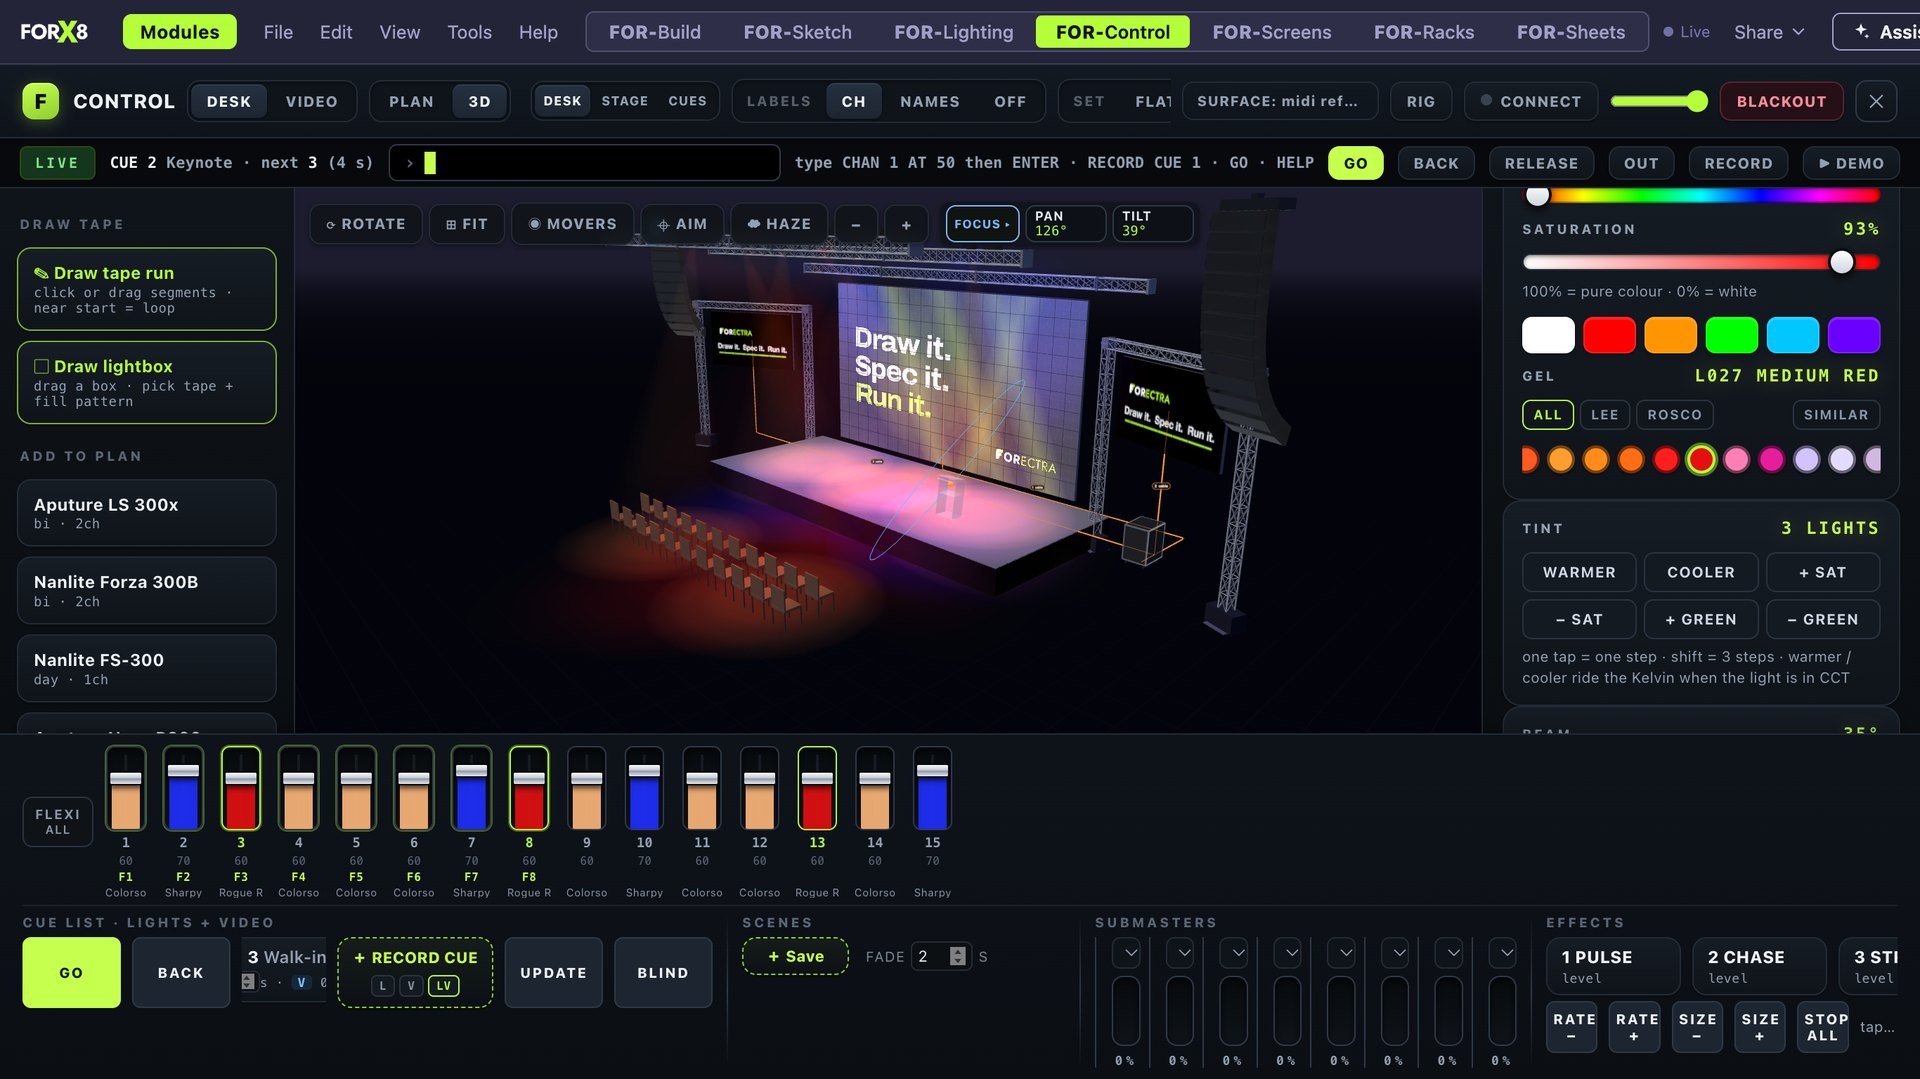
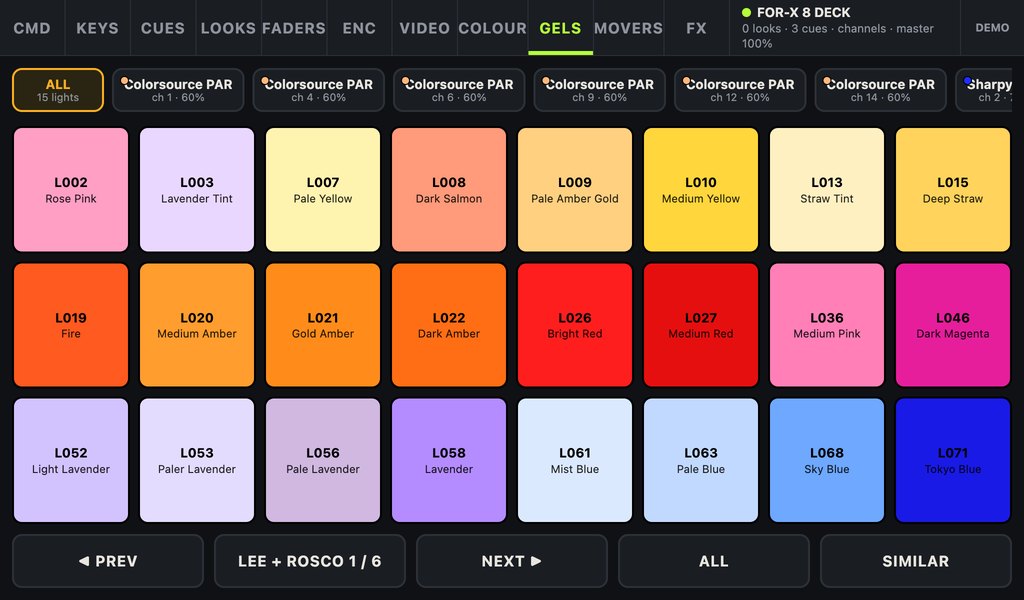
Select a light (tap it on the stage, or type a channel). The tech panel shows its colour block: hue and saturation, the gel book as dots (ALL · LEE · ROSCO; SIMILAR sorts the book nearest to what the light has), and the tint row (WARMER, COOLER, +/- SAT, +/- GREEN). A CCT light (a par) gets colour temperature in Kelvin; a colour mixer gets the gel's colour; a CMY mover gets it too.
7.5 Movers: MOVERS, AIM, encoders
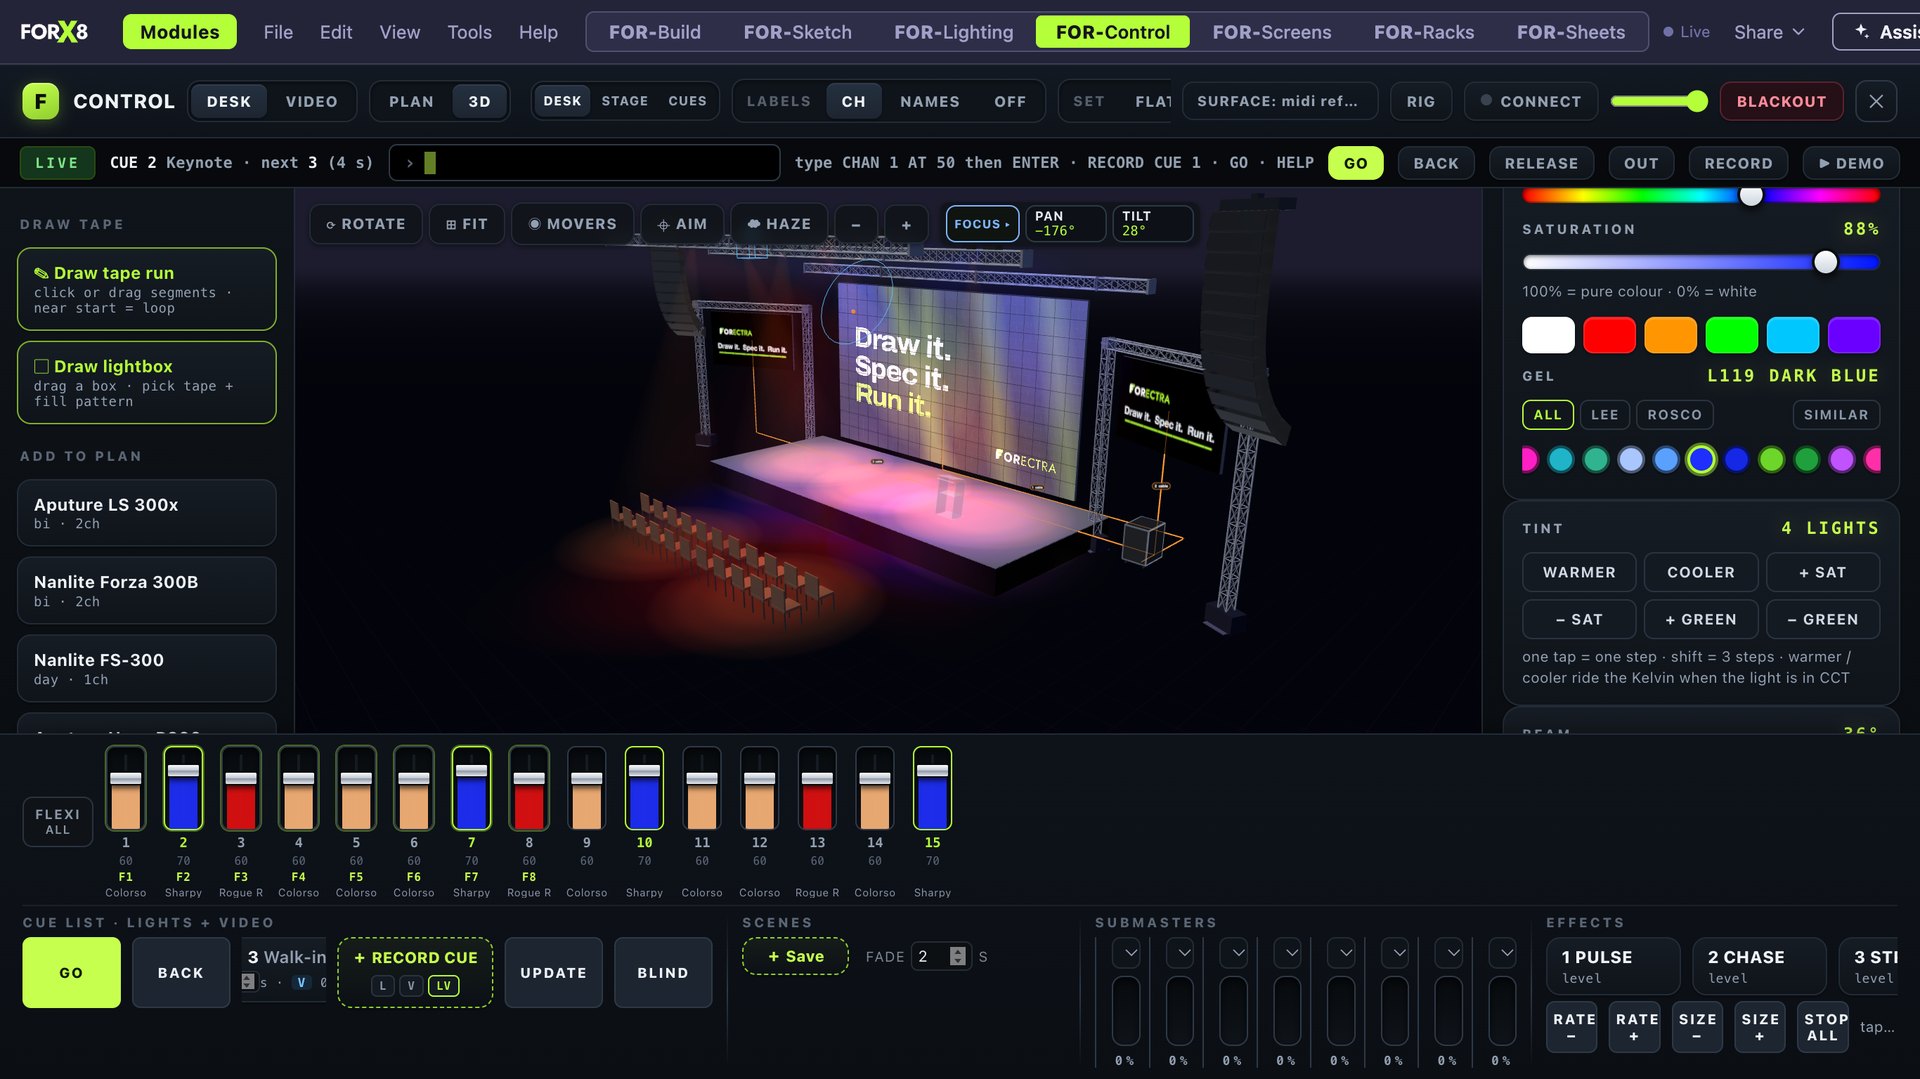
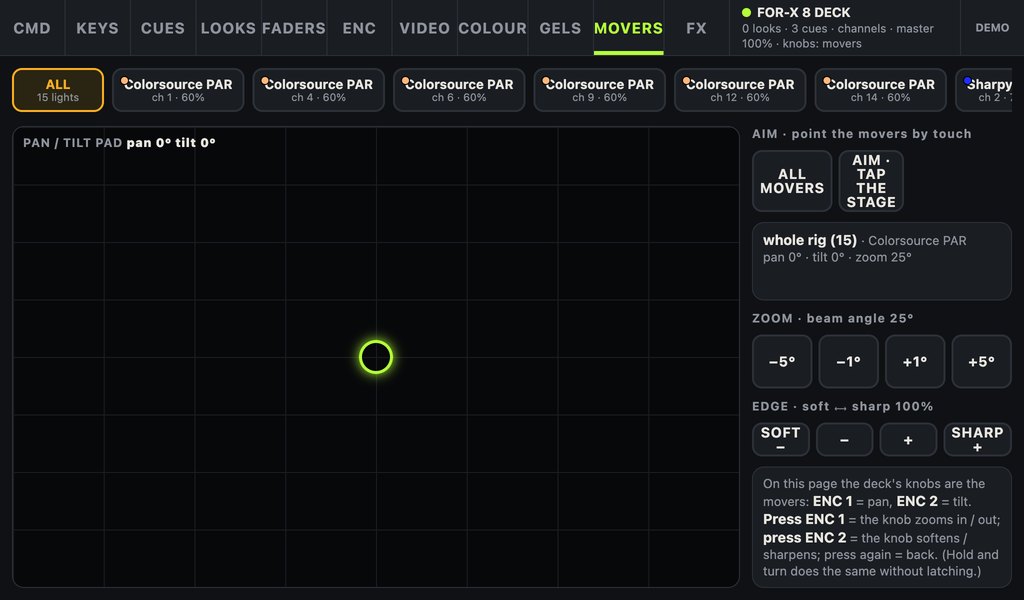
MOVERS selects every moving light. AIM: tap the stage (plan or 3D) and the selected movers point there; tap again, they follow; Esc ends it. An aim writes pan and tilt, so DMX and cues carry it. The encoder tiles (LEVEL · FOCUS · COLOR · BEAM) give the knobs: pan/tilt, zoom, edge, iris; the knobs follow what you pick.
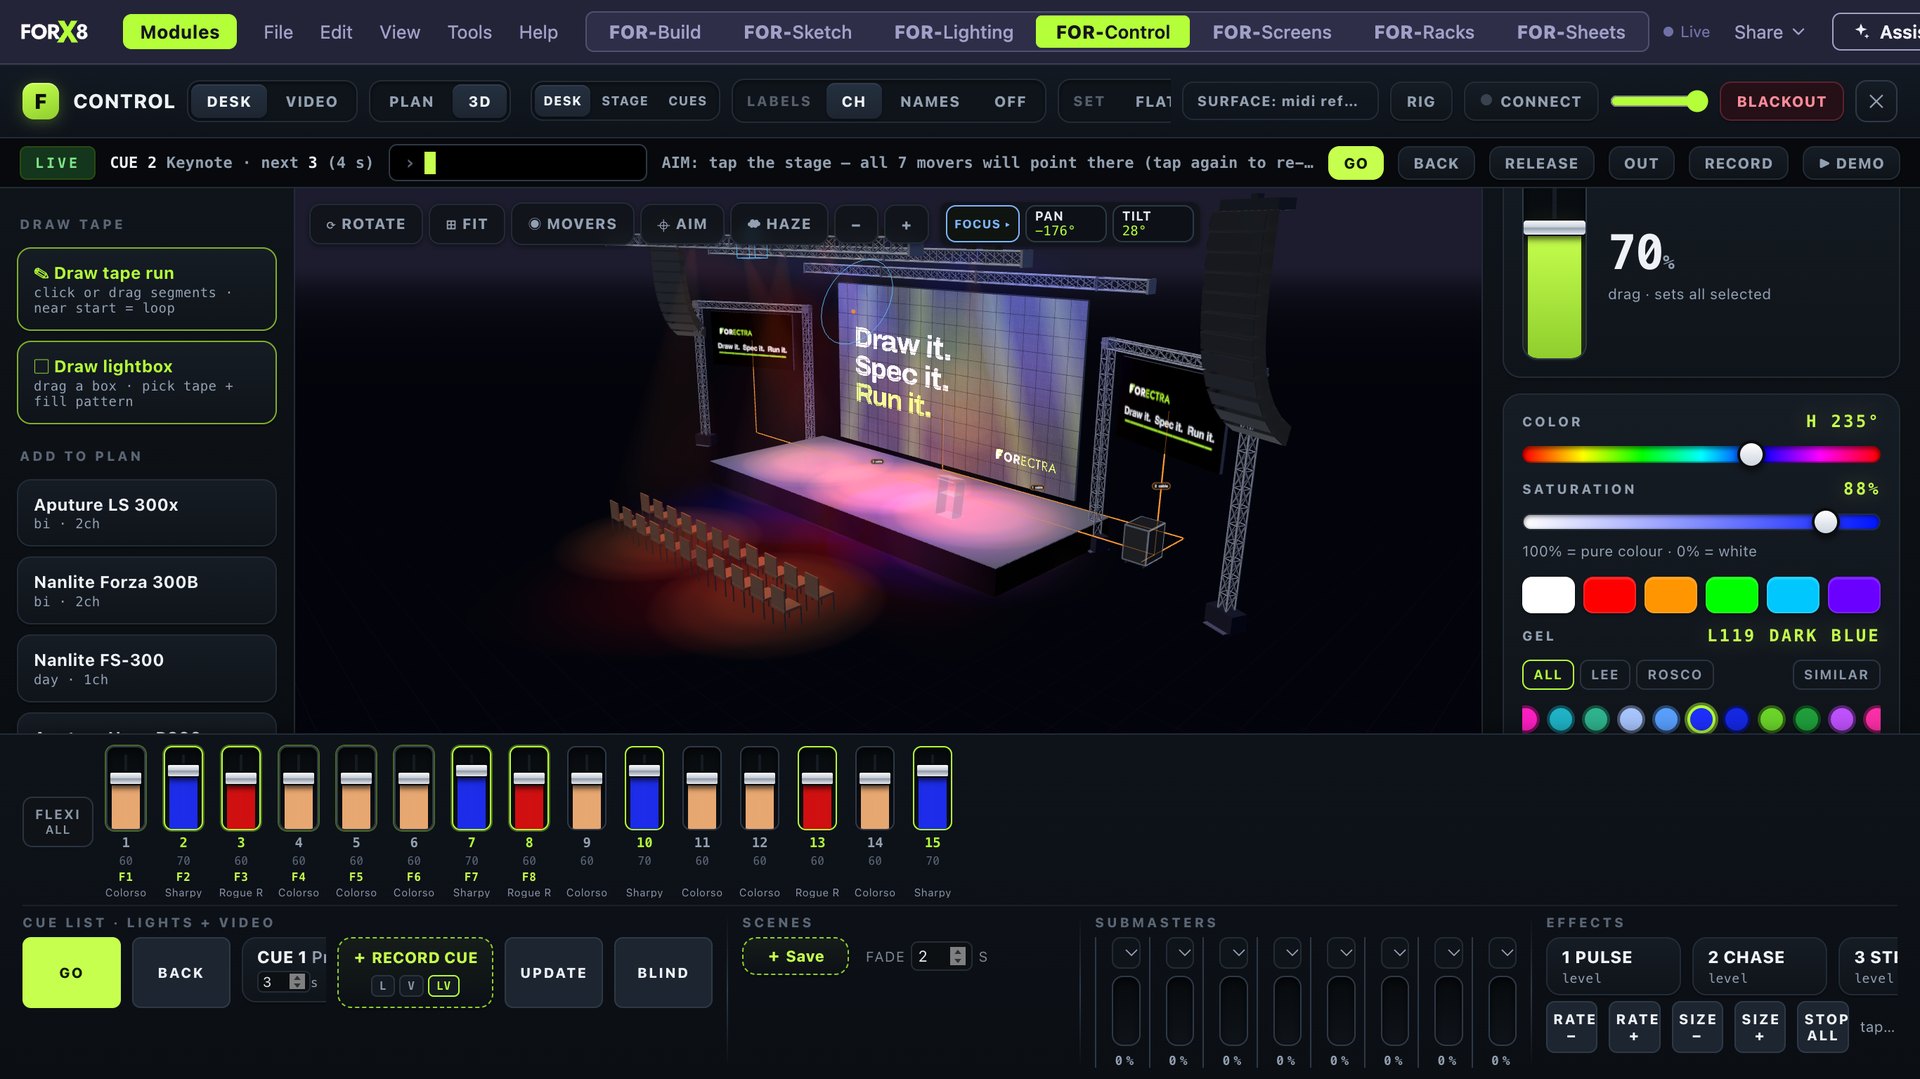
7.6 Effects
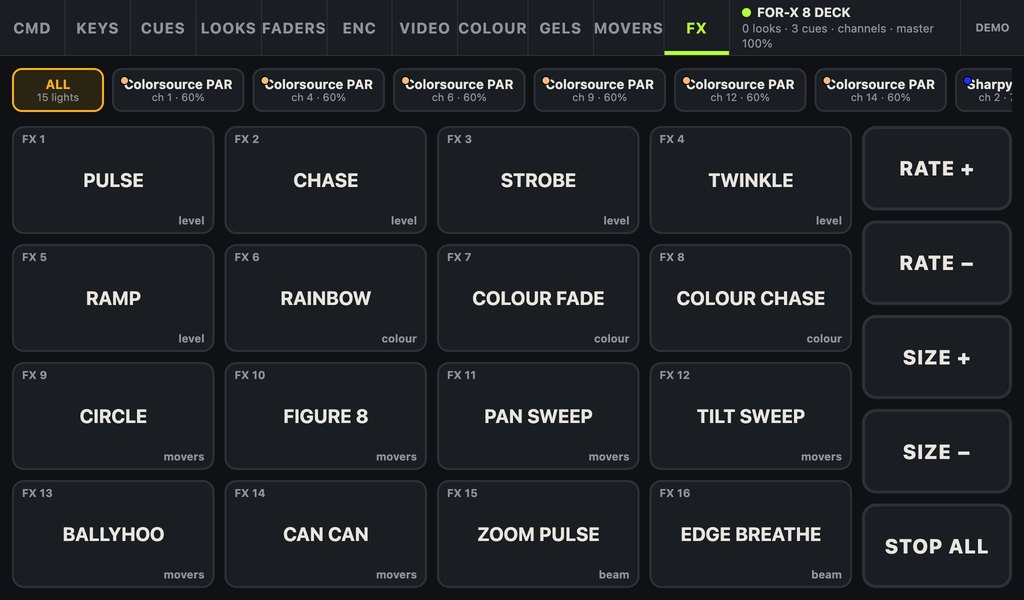
The 16 presets (PULSE, CHASE, STROBE, TWINKLE, RAMP, RAINBOW, COLOUR FADE, COLOUR CHASE, CIRCLE, FIGURE 8, PAN SWEEP, TILT SWEEP, BALLYHOO, CAN CAN, ZOOM PULSE, EDGE BREATHE) run on the selection; RATE and SIZE buttons or EFFECT 6 RATE 50. A cue records its running effects; CUE OUT stops them.
7.7 Layouts: DESK · STAGE · CUES
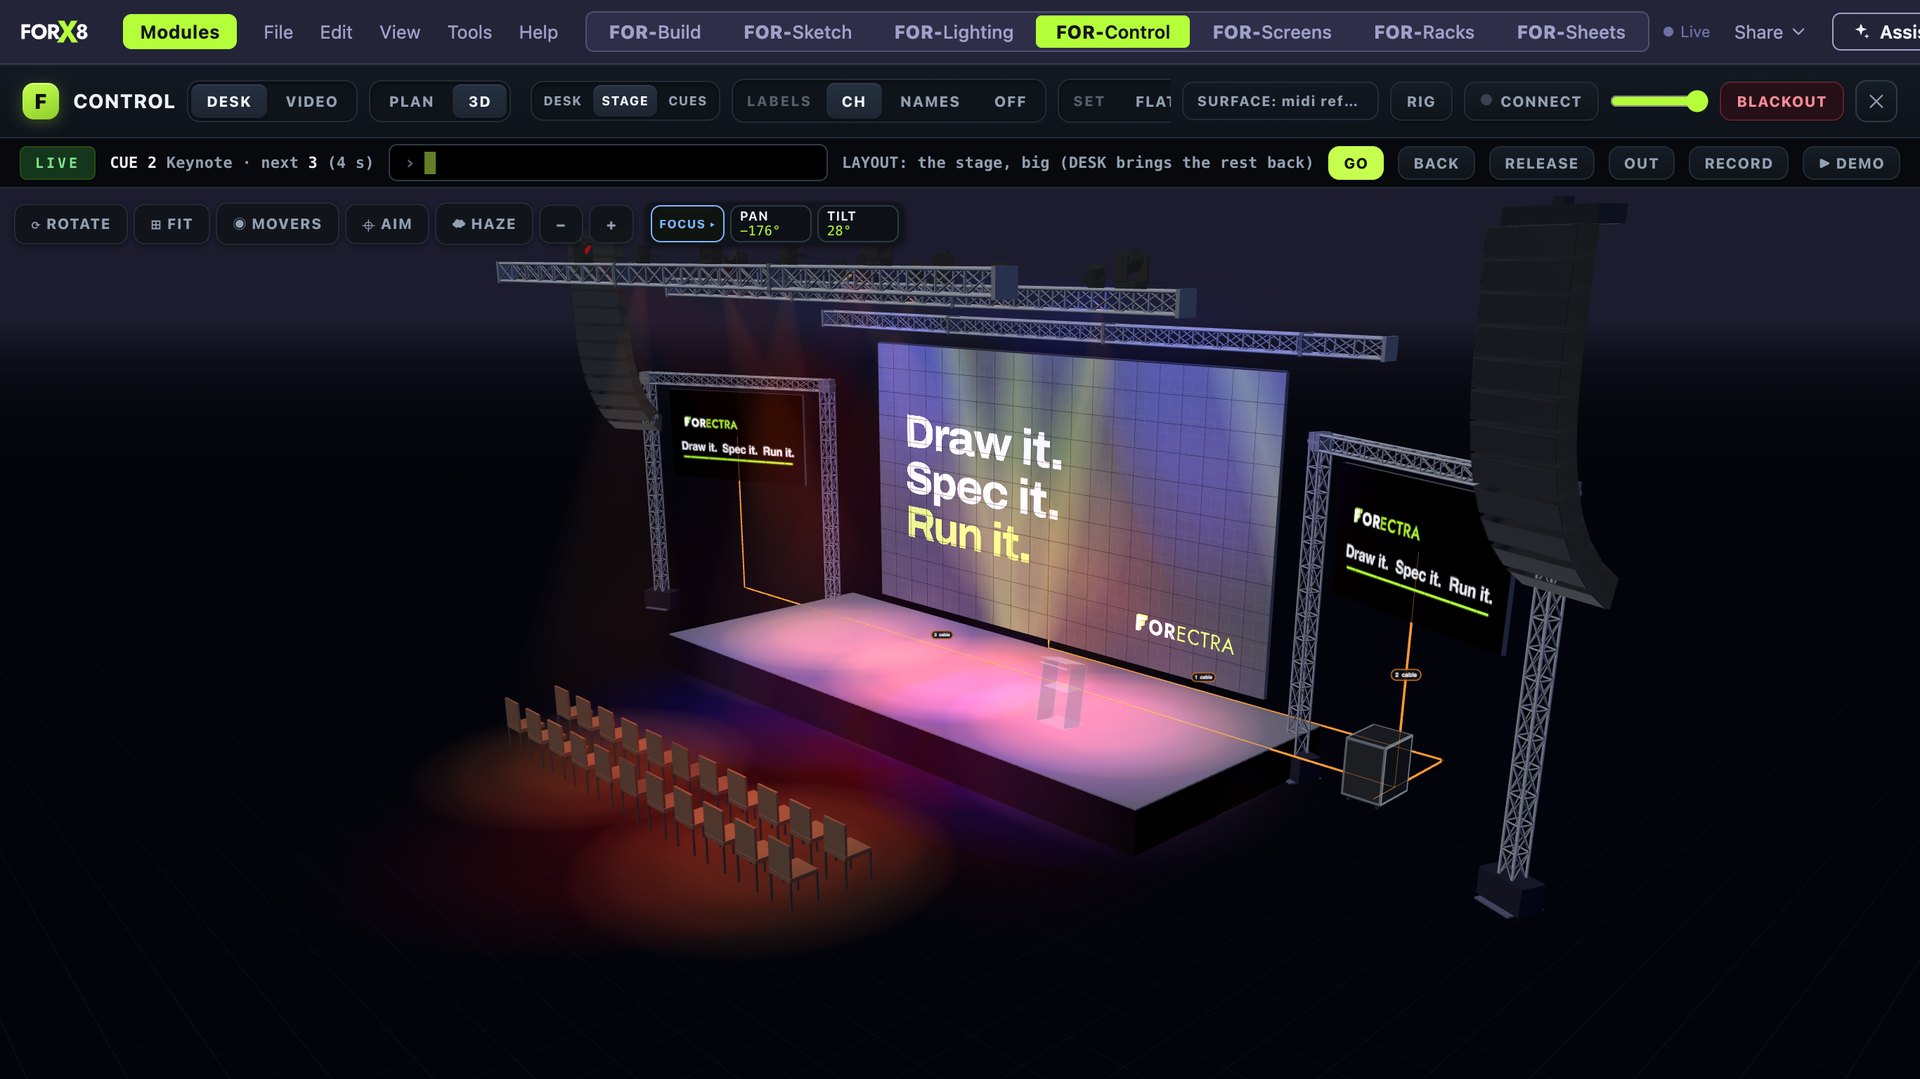
The DESK · STAGE · CUES segment in the head, beside PLAN | 3D. DESK is everything. STAGE is the plan or 3D filling the screen (for AIM by touch). CUES is the cue list as cards and the faders tall, no stage. The head and the command line stay in every layout. The box remembers the choice.
7.8 RIG, RDM, LIVE, CONNECT
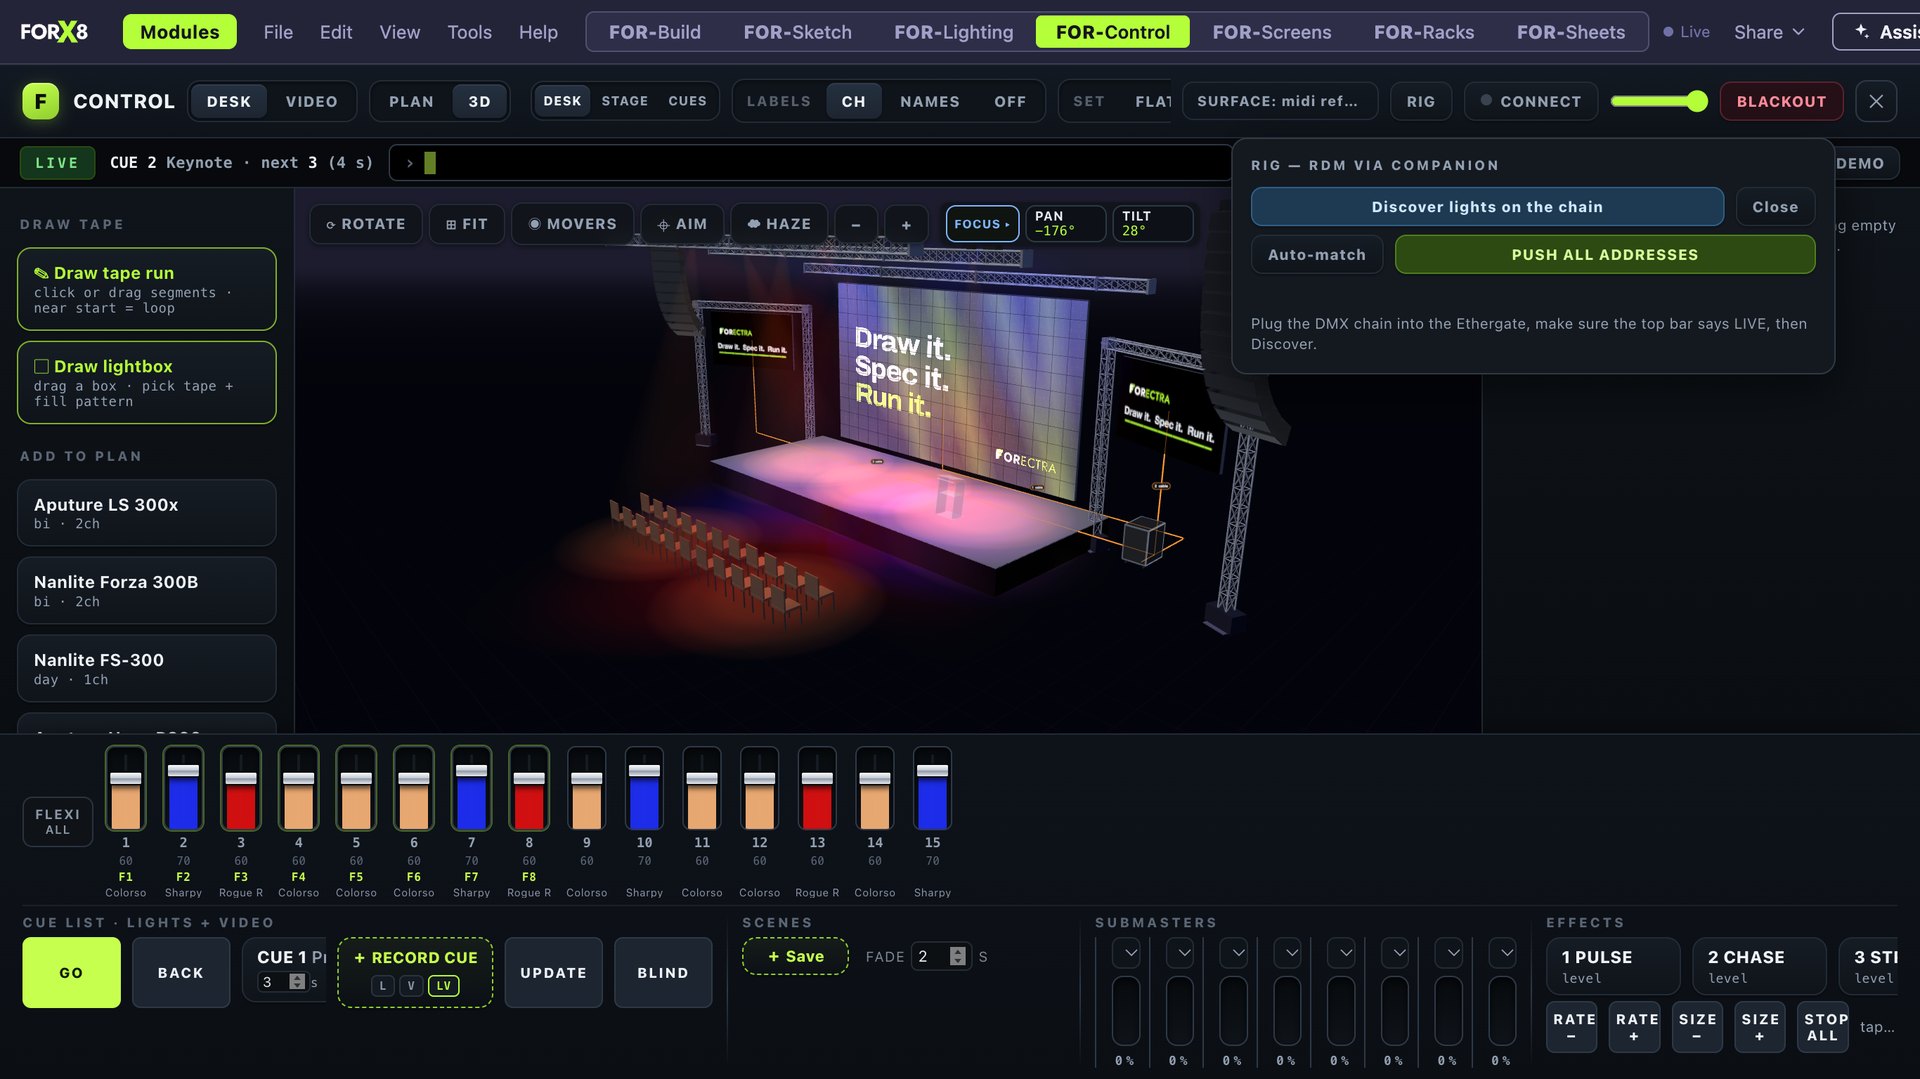
RIG opens the patch window: every light's universe and address, auto-patch, and RDM discovery when the box is on the network (the found fixtures are matched to the catalogue; a Type… picker fixes a wrong match). CONNECT is the Ethergate (sACN / Art-Net out on both DMX ports). LIVE says the box is talking to the world.
7.9 DEMO
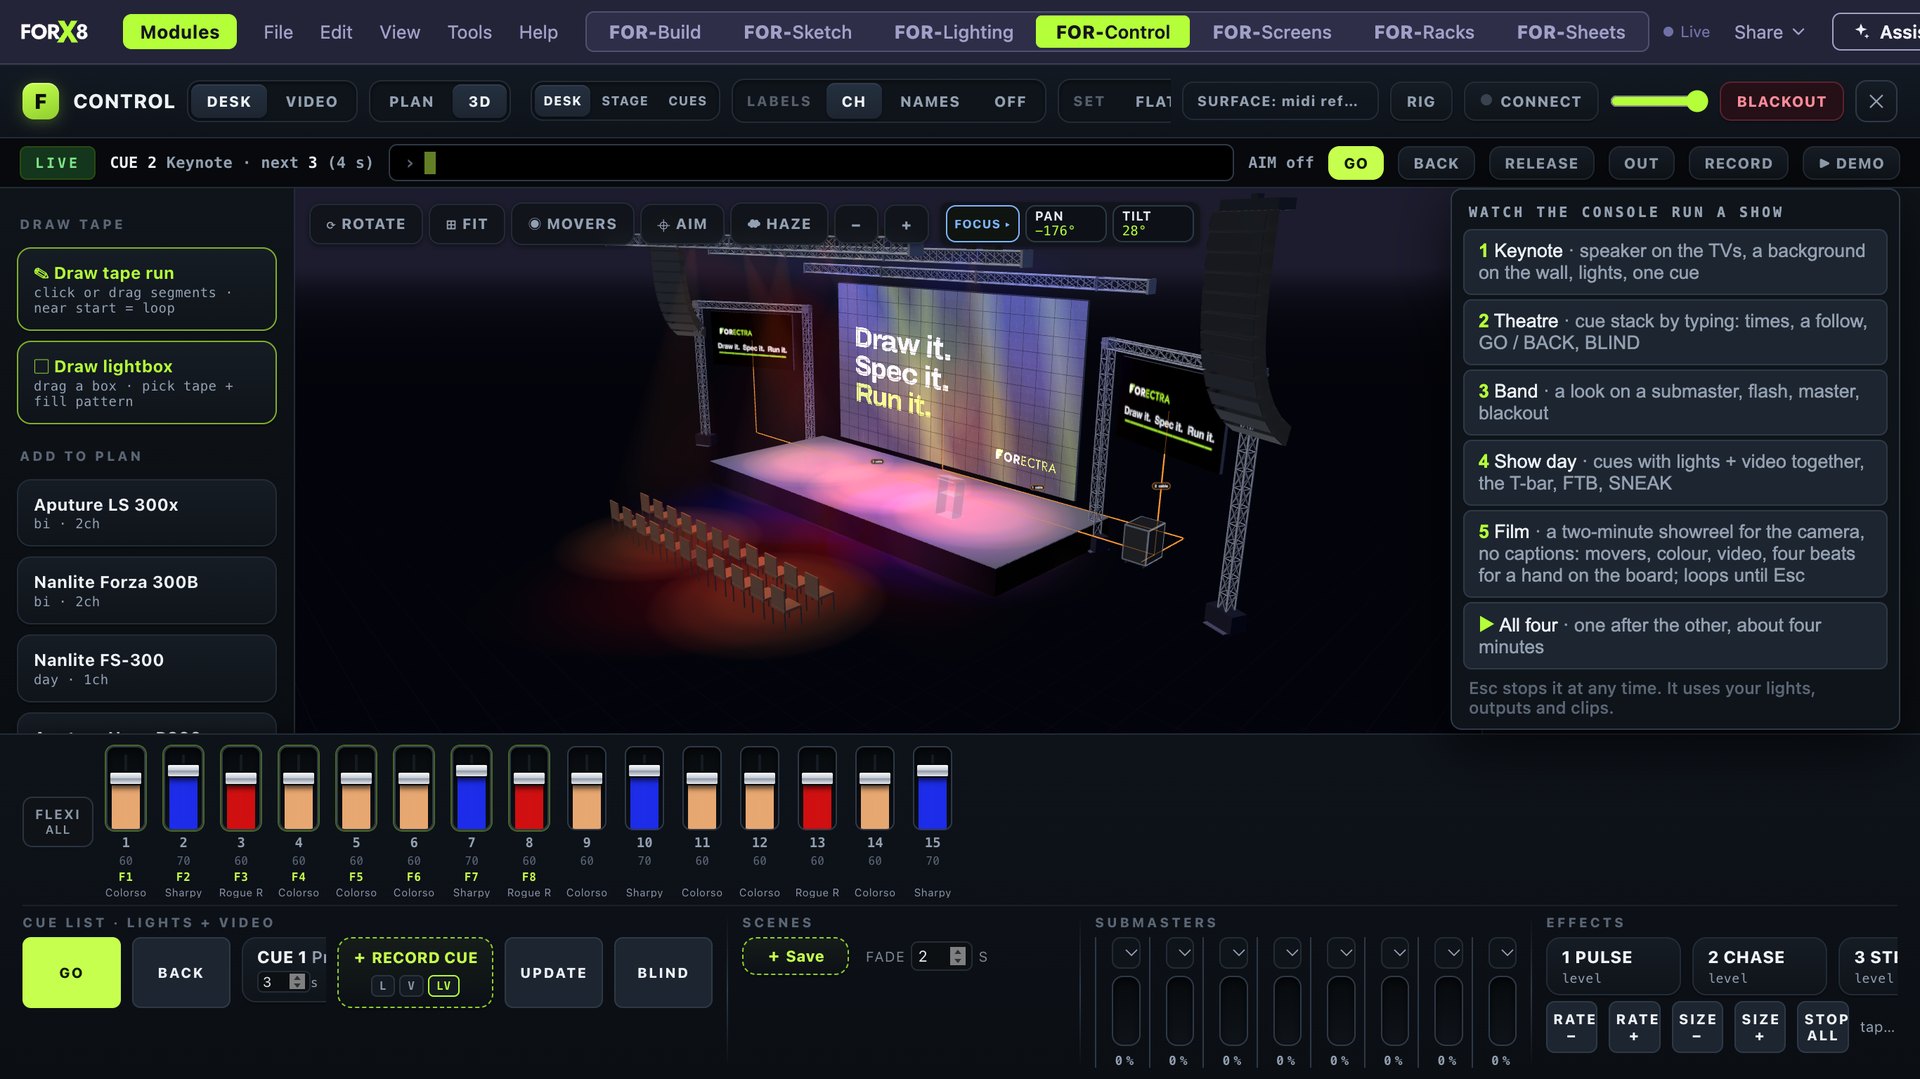
▶ DEMO plays a show on the real console with a moving cursor and captions: Keynote, Theatre, Band, Show day, All four. 5 · Film is a two-minute showreel for the camera with no captions and four hand beats (AIM, fader 1, GO, BLACKOUT); it loops until Esc. Esc stops any demo and nothing is left running.
VIDEO — the switcher
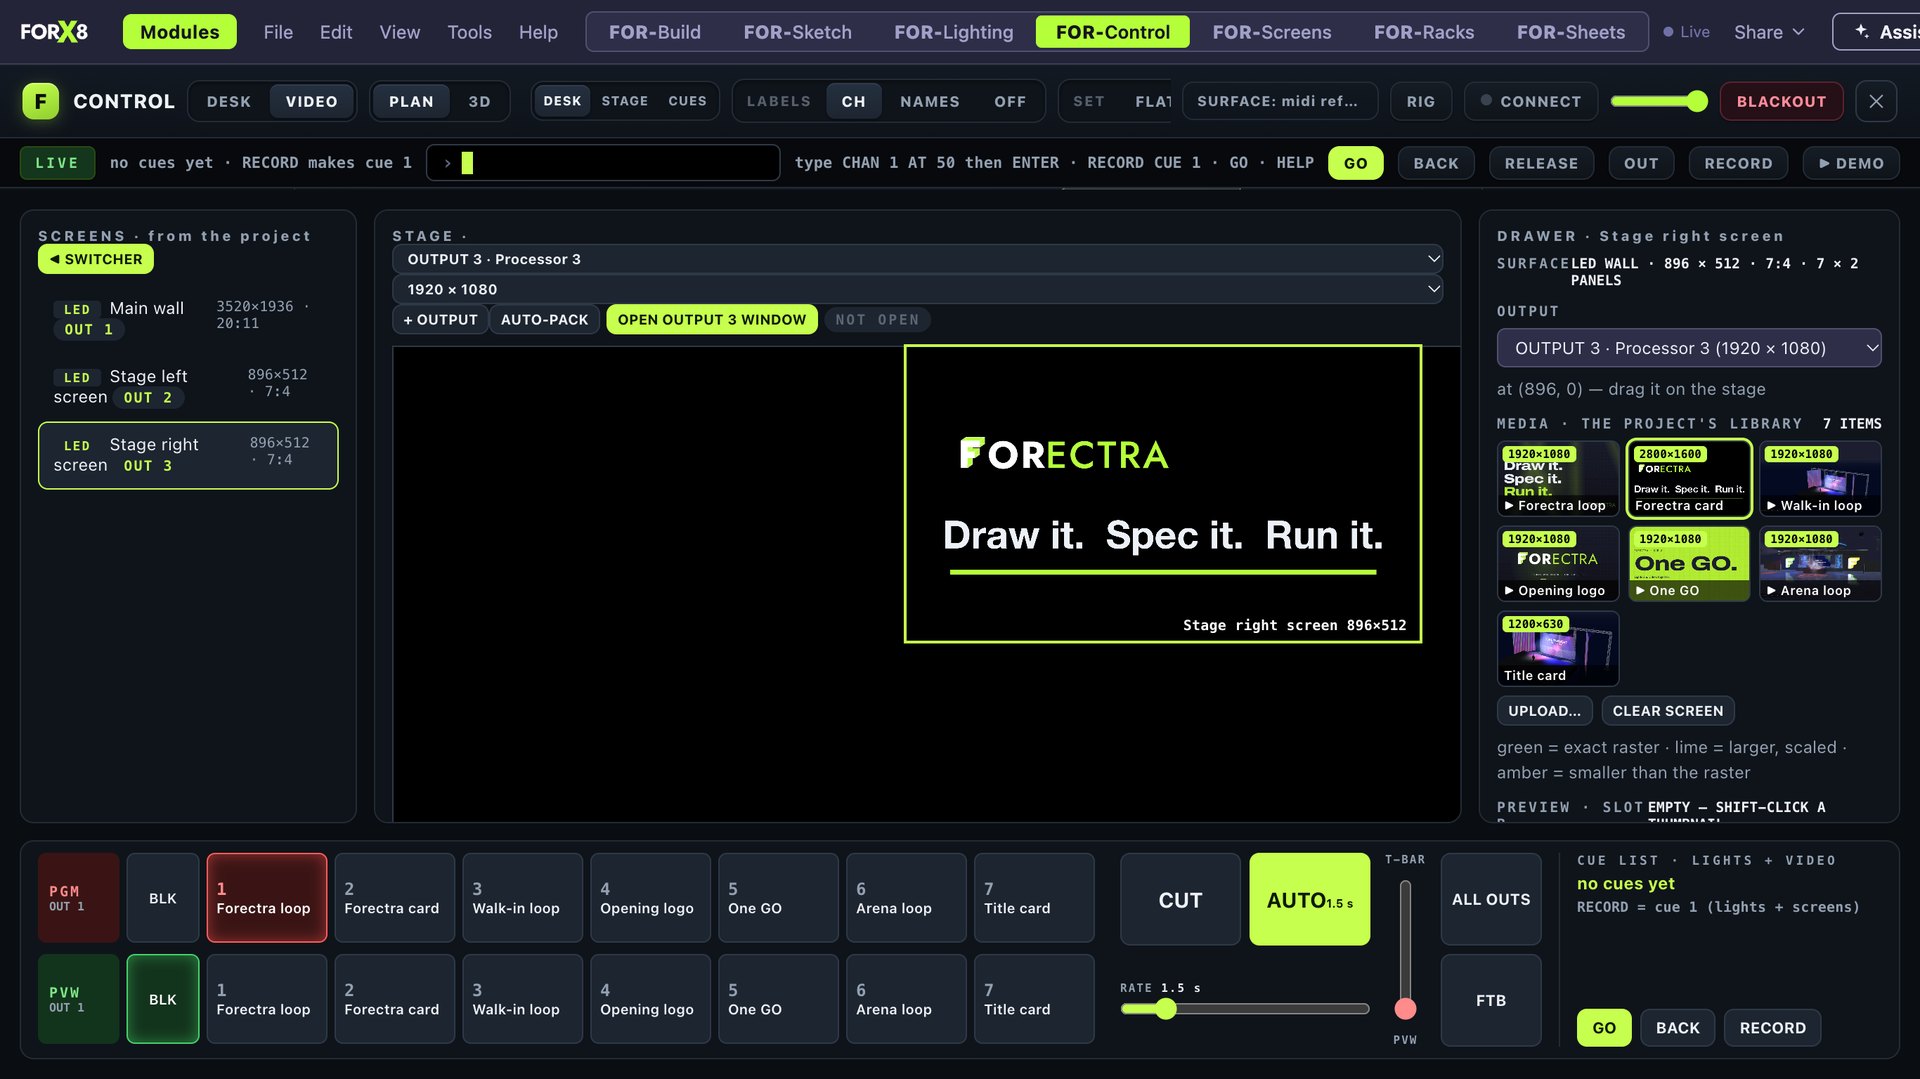
DESK | VIDEO at the top of FOR-Control switches to the switcher. SETUP is where screens are put on outputs: every screen in the show (walls, IMAGs, TVs, projectors) and which output it is on, at what place in the output's raster. An output is a processor or TV lead: a name, a size (1080p or 4K), a monitor (on the box: which HDMI or USB-C screen), a fade time. + OUTPUT adds one. TIDY deletes every output with no screen on it; the ✕ on an empty strip deletes that one.
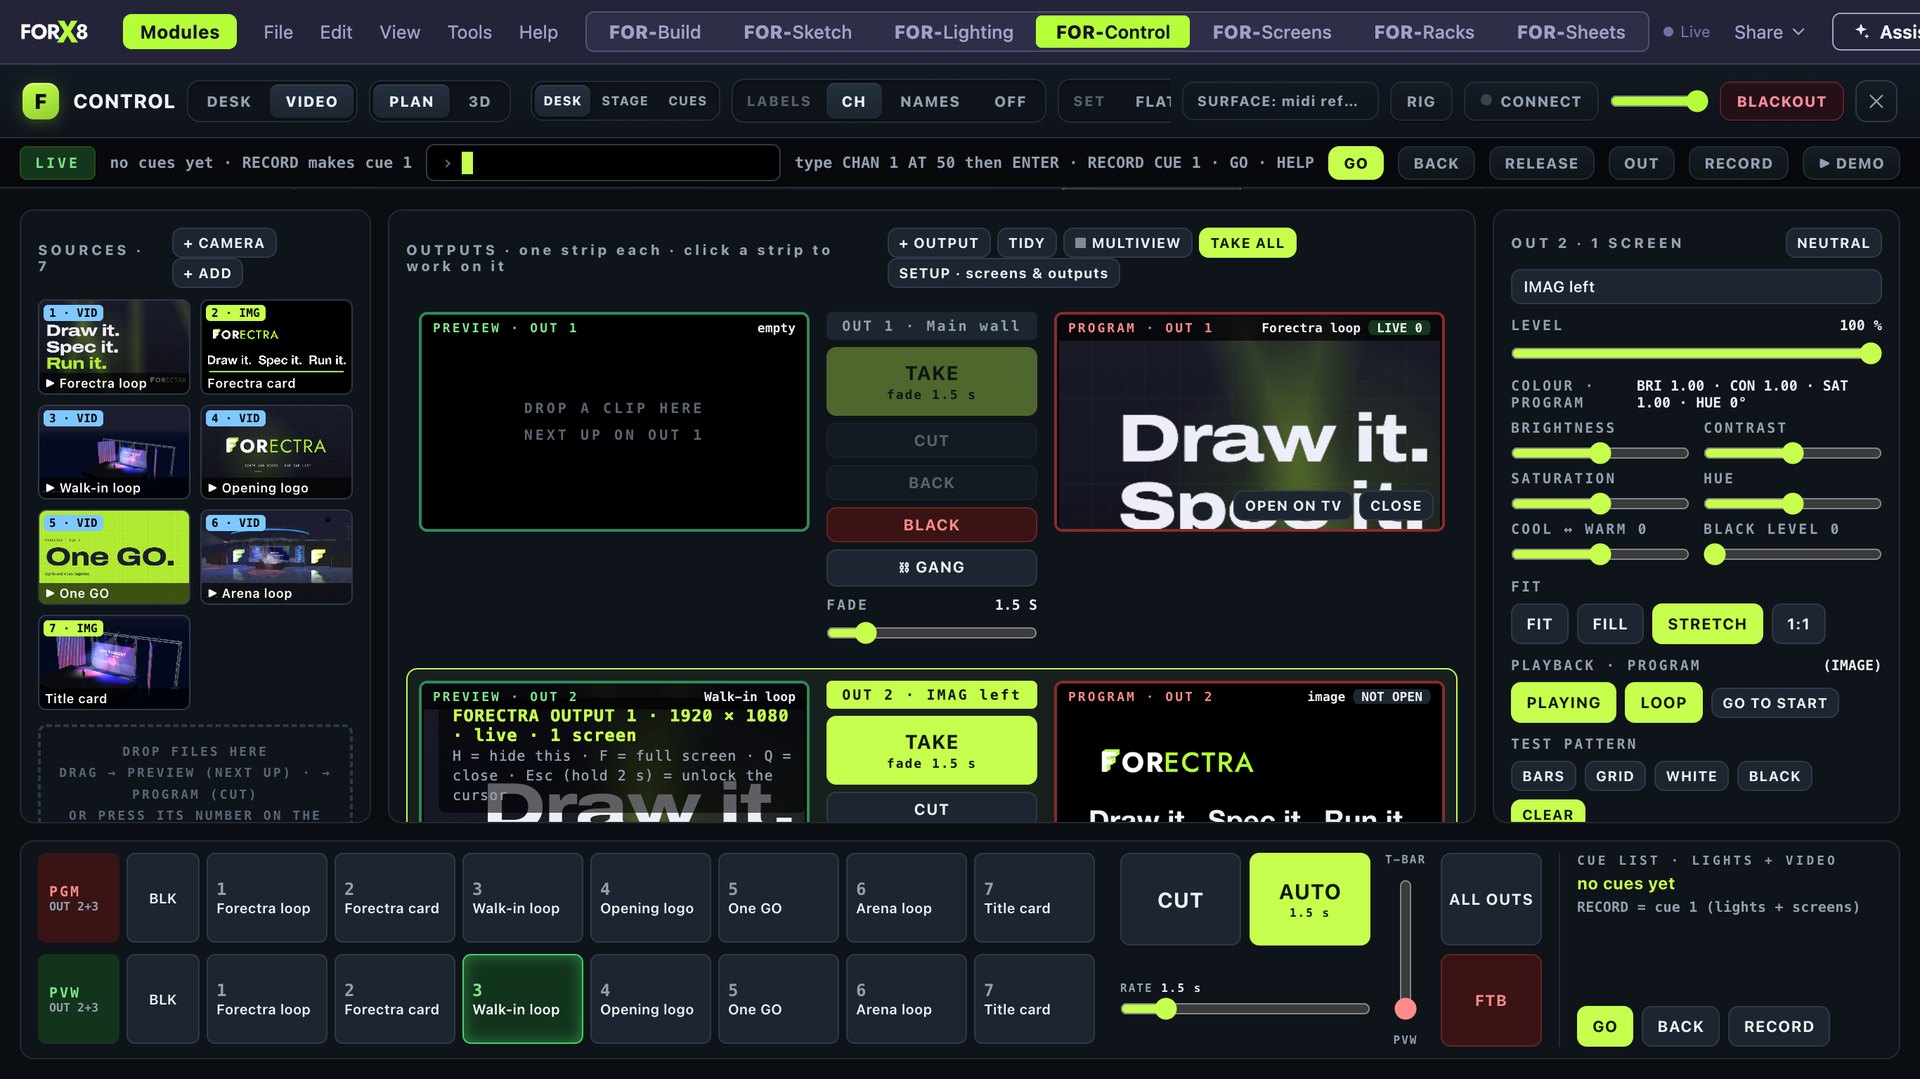
SWITCH is the live desk. Left: the sources bin (drop files; + CAMERA adds a USB capture card as a live source). Middle: one strip per output: PREVIEW (next up) over PROGRAM (on air), TAKE, CUT, BACK, BLACK, FADE, and GANG. Ganged outputs preview, take, mix, fade and black together; the others are left alone (two IMAGs ganged, the main wall on its own). Bottom: the bus panel for the selected output (or its gang): PGM row (click = cut it on air), PVW row (click = next up), CUT, AUTO (dissolve over the rate), the T-BAR by hand, ALL OUTS (every output at once), FTB (fade to black, press again = up), RATE. Right: the cue list: GO, BACK, RECORD (lights + screens as the next cue).
Video cues and looks: RECORD on this side records the screens (and the lights, per the scope chip). A video cue can follow a lights cue. The 5-inch panel's VIDEO page mirrors the strips.
8.1 Output windows and the multiview
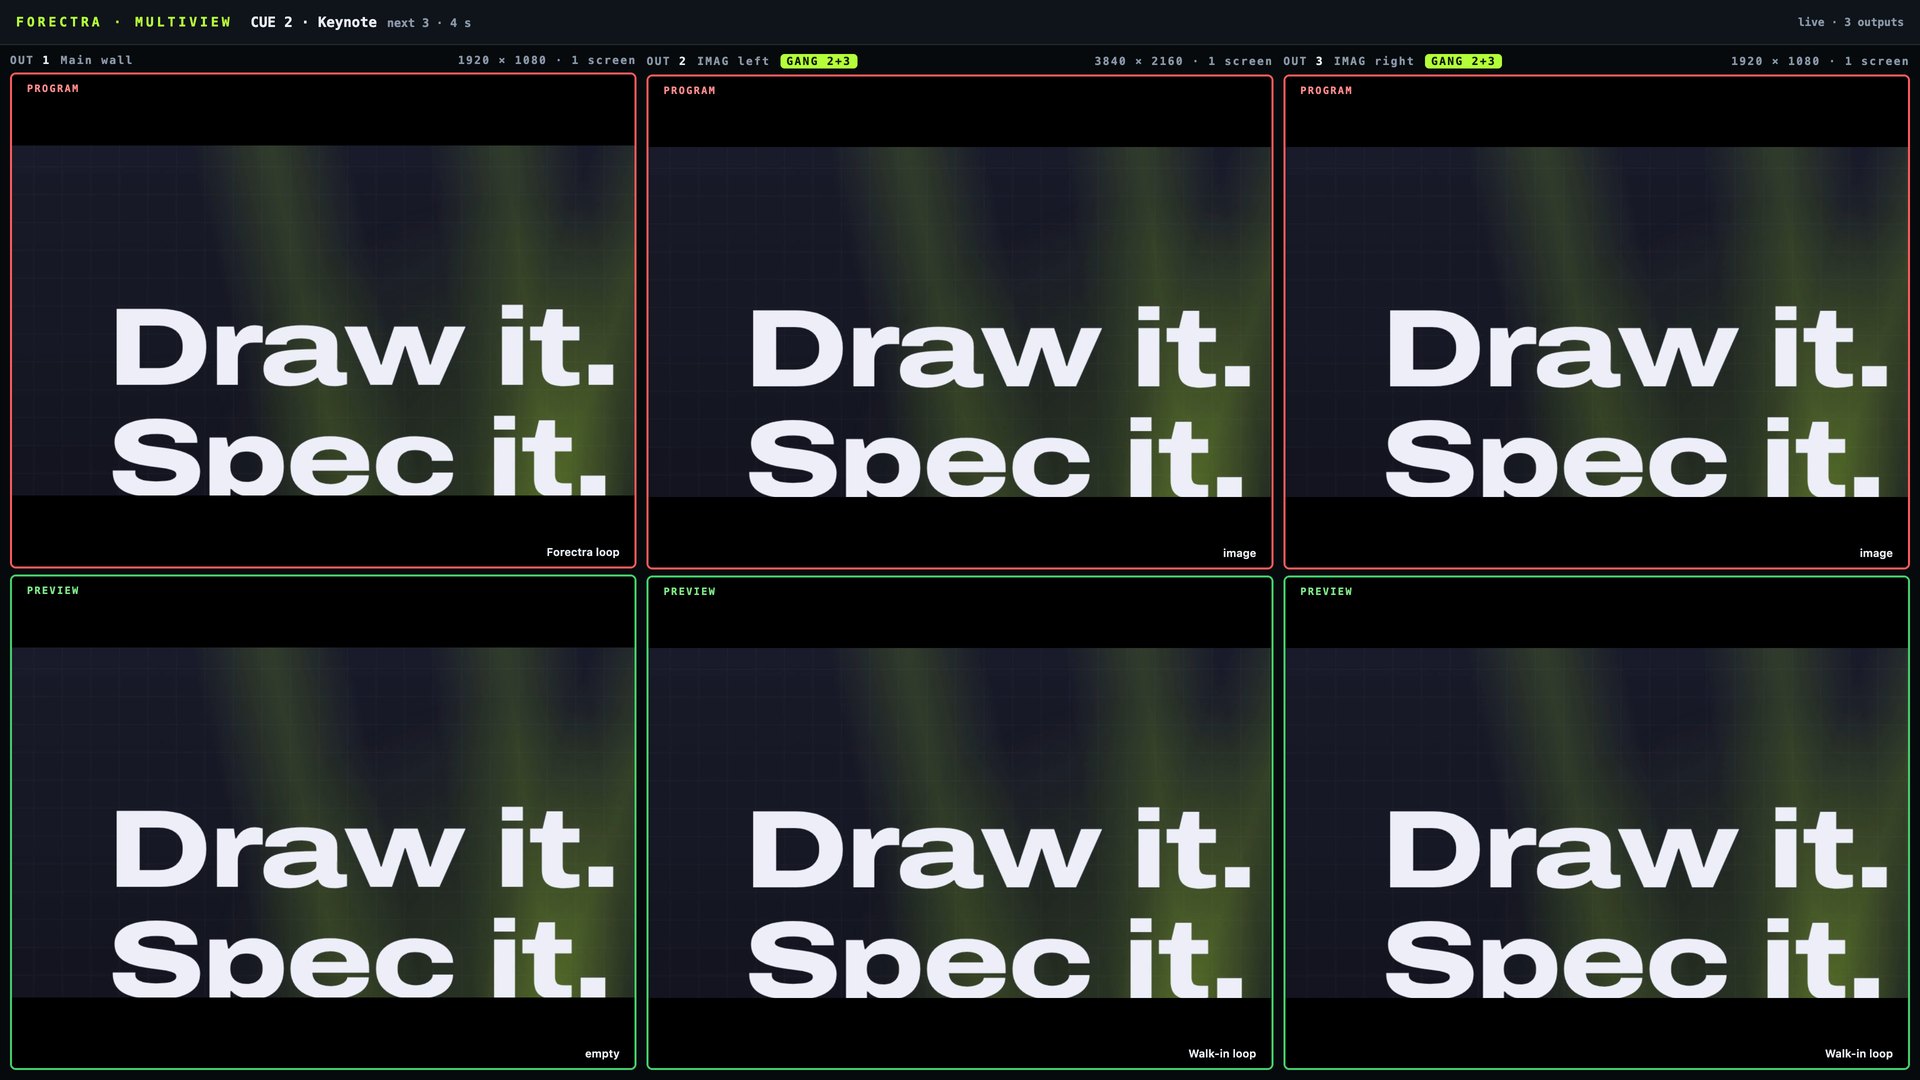
OPEN OUTPUT n WINDOW (per output, in SETUP) opens that output's picture full screen on its monitor; the dropdown beside it picks the monitor. MULTIVIEW opens one window with every output's PROGRAM and PREVIEW across, the cue line and the gang tags, on the monitor you pick beside it. F = full screen, Q = close. Only outputs that carry a screen are shown.
The 5-inch panel
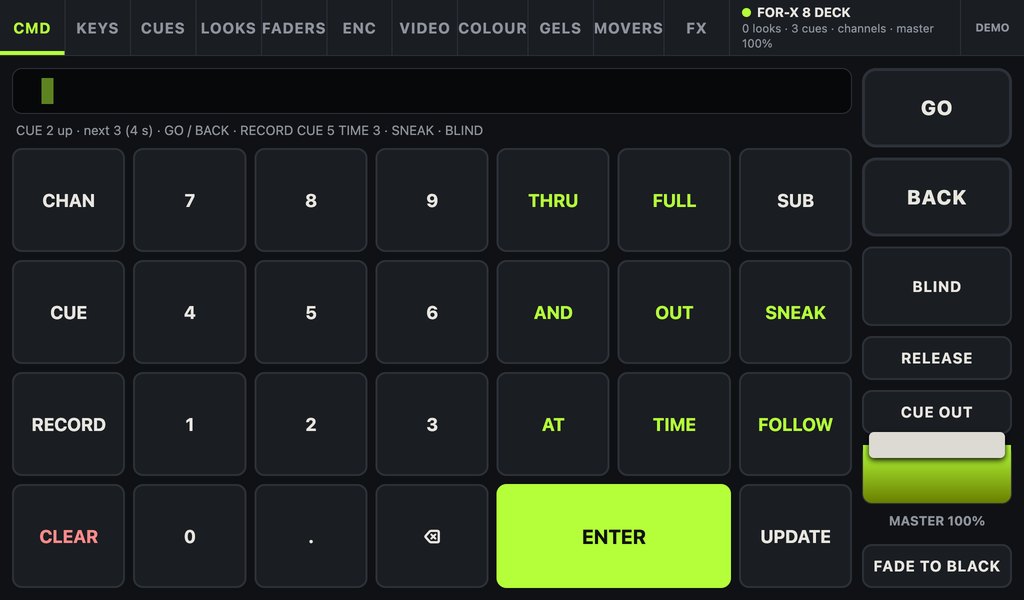
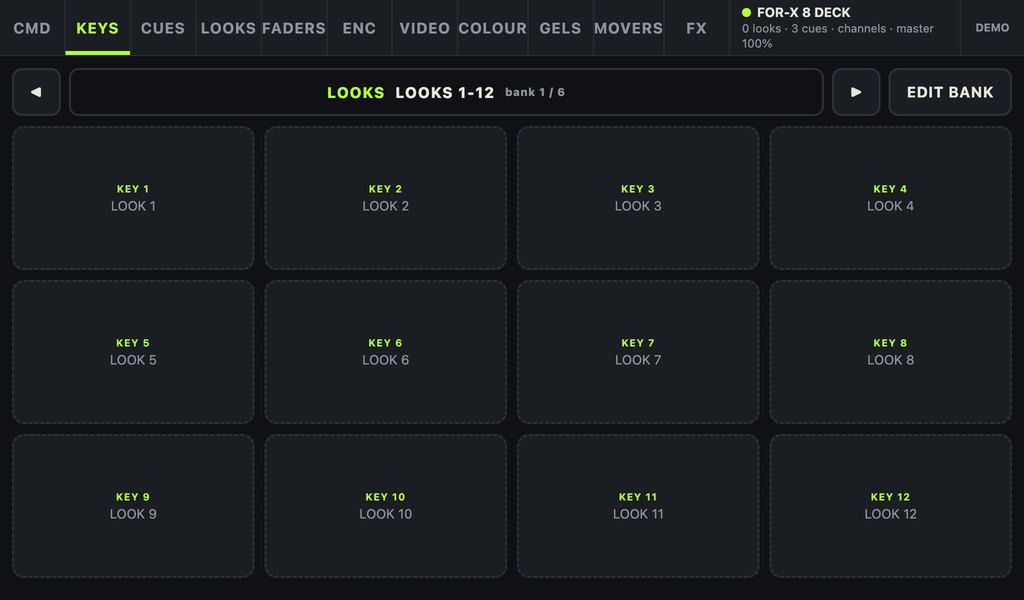
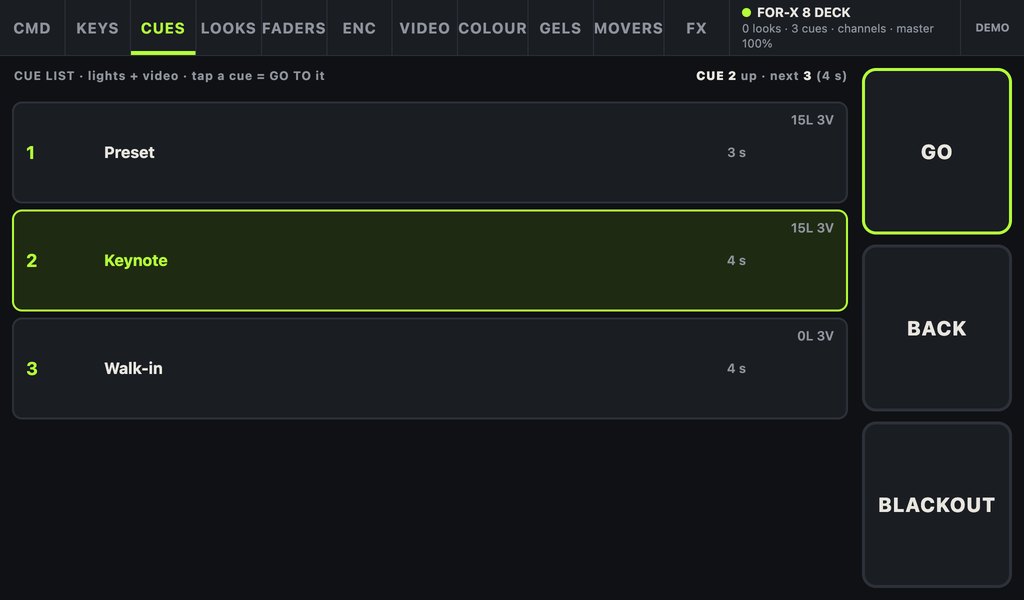
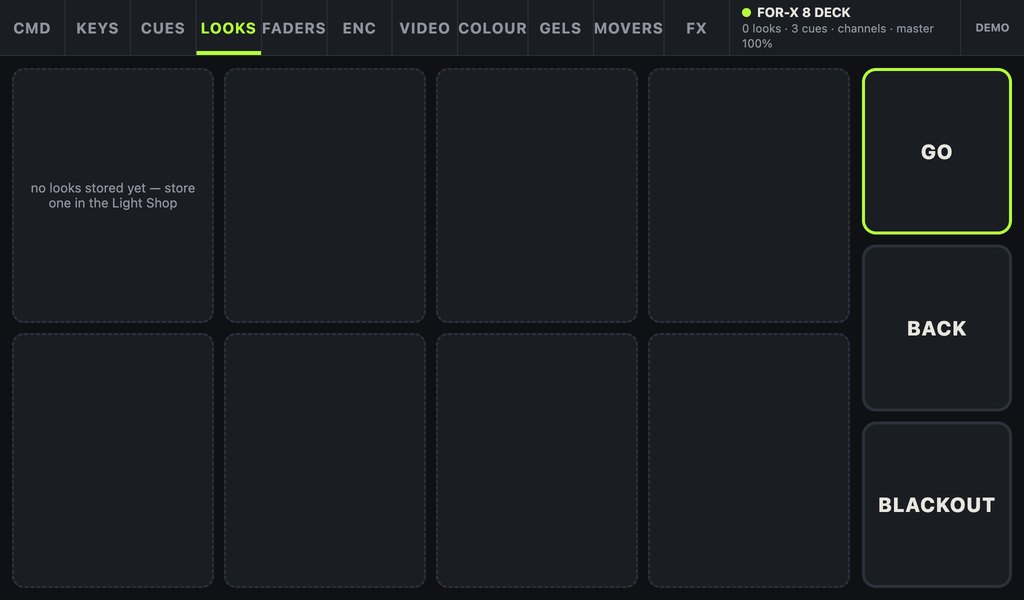
The touch panel on the box is a second desk in your hand: tabs across the top.
| Page | What it is |
|---|---|
| CMD | the keypad: channels, AT, THRU, FULL, OUT, RECORD, GO, BACK, the command line |
| KEYS | the target keys (banks of lights, subs, cues) |
| CUES | the cue list: tap one to go there |
| LOOKS | scenes |
| FADERS | what the eight faders are (bank, subs, loads), ◀ ▶ steps the bank |
| ENC | the encoder tiles (LEVEL · FOCUS · COLOR · BEAM) |
| VIDEO | the switcher strips: preview, take, black, per output |
| COLOUR | the colour wave by touch, the tint row |
| GELS | the gel ring |
| MOVERS | the pan/tilt pad, AIM, MOVERS |
| FX | the effects |
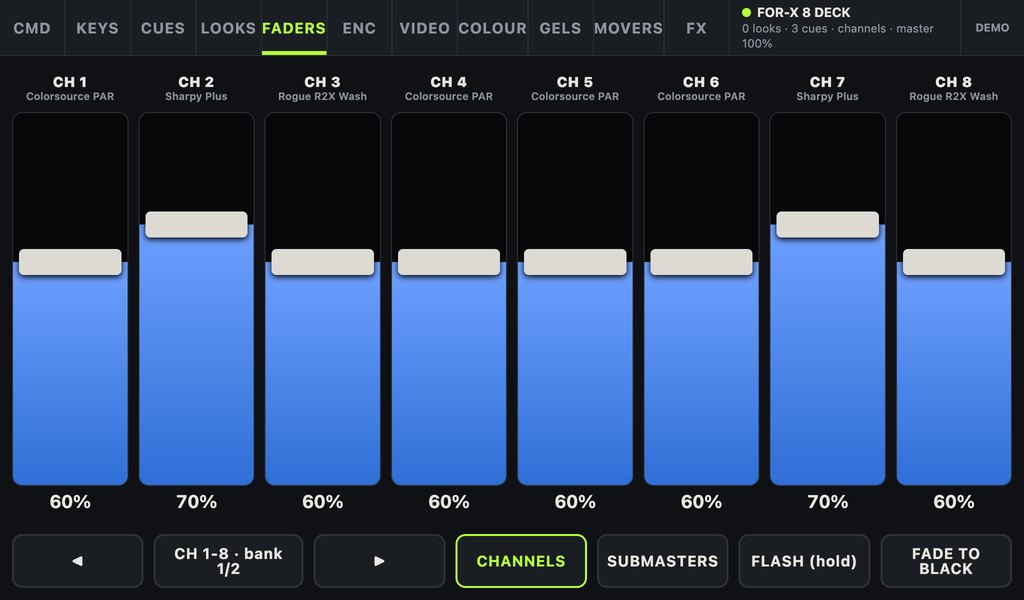
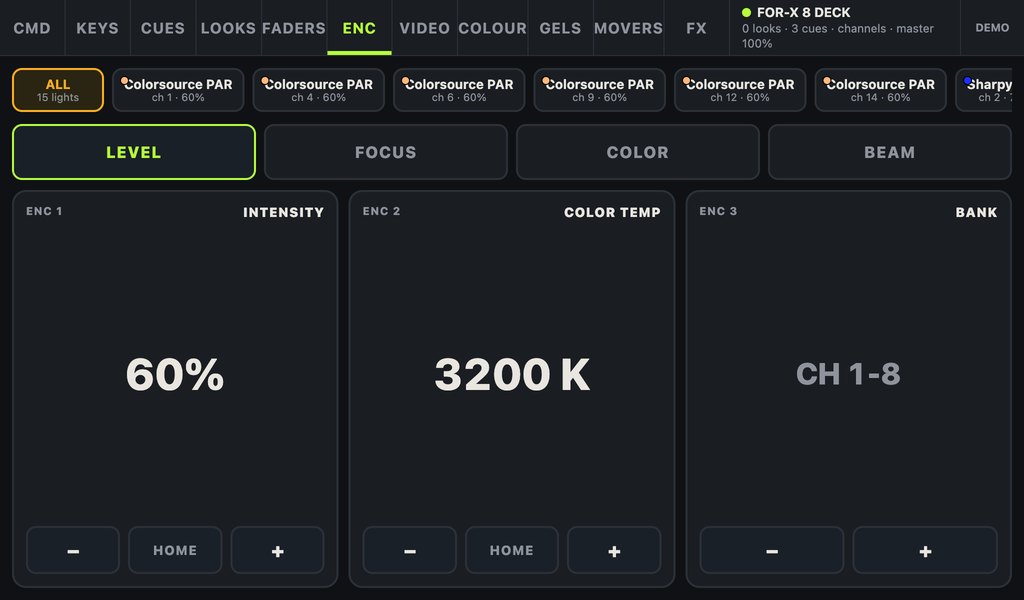
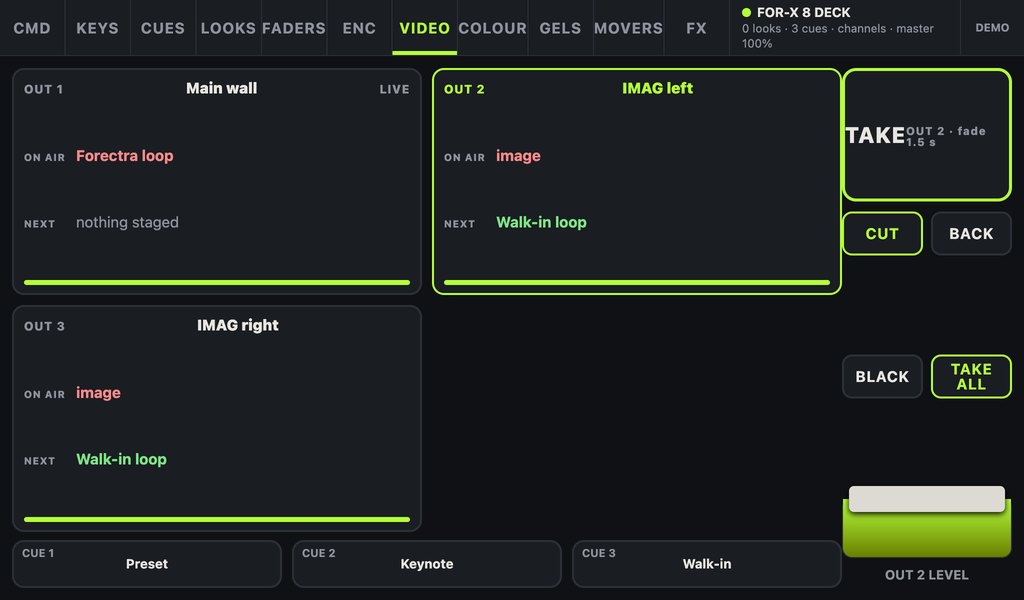
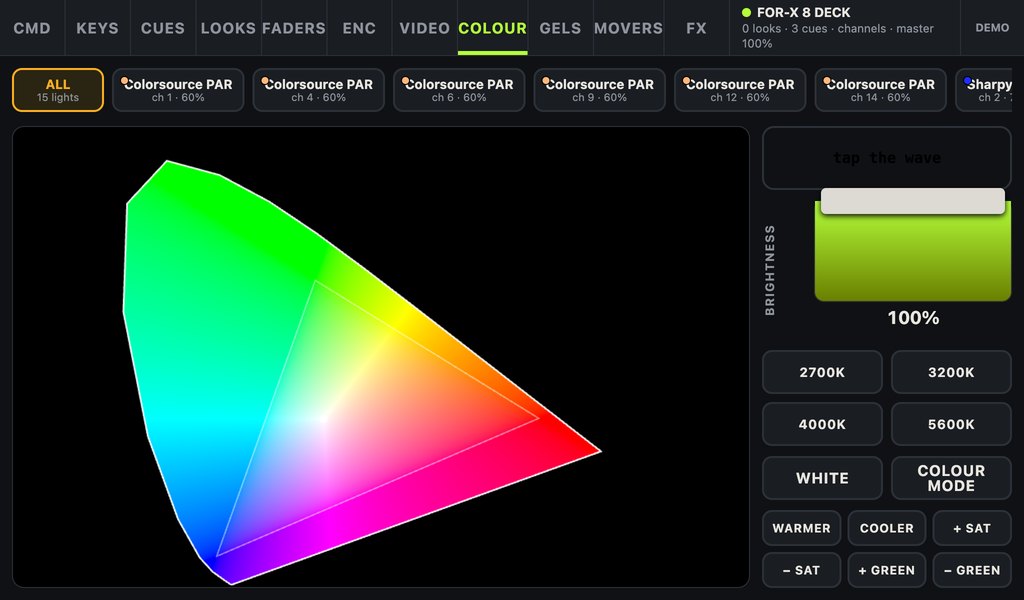
The FOR-X 8 box
The box is a standalone console: any Forectra user signs in on it and loads their show; a thumb-drive .json works too. Rear: USB-C (the A8's USB4: video out with a DP-MST hub, USB, power), DMX A, DMX B, mains. Side: HDMI 1, HDMI MON. Inside: GEEKOM A8, Ethergate Mk2 (2 DMX universes out of the ports; sACN/Art-Net on the network, no cap), the 14-inch touch lid, the 5-inch panel, eight faders, GO / BACK / BLACKOUT.
Video heads without opening the box: HDMI 1, HDMI MON, and up to two off the rear USB-C through an MST hub. A USB capture card in any USB port is a live source.
Lock (Shift+Esc or LOCK) locks the console; DIM 10 dims it after ten idle minutes.
Twenty days free. The whole app.
Draw the show, print the paperwork, run it from the desk. No card to start.
Start free trial